


Post by Darko on Sept 22, 2022 14:26:26 GMT
Welcome to Hive Ulysses, a gargantuan, bloated hive in the northern tundra of the ice world 4296-Gamma. It is named after the warrior-prince and later saint of the same name, who was tragically felled by a chaos berserker atop a mountain on this world, far from his home. Though their leader was killed, the armies he commanded destroyed the remaining chaos, bringing the crusade to a close. This otherwise worthless ice rock in space has a vast natural reserve of both prometheum and elements used in the creation of power armour. As such, a huge hive was established to exploit these resources for the good of the Imperium.
Five thousand years have passed since then and the resources under Hive Ulysses are all-but used up. The once proud Hive has descended into ever-increasing states of anarchy, with little support from the uncaring Imperium who has all but forgotten 4296-Gamma. The underhive and mine network is almost completely abandoned to the scummers, scavs, mutants and gangers who reside there. The noble families are leeching what profit they can still turn, though the Hive seems doomed to die a slow death.
In the vast depths of the underhive, an entirely different story plays out. The low-lives down there care not for the wider Imperium, just for gaining power and thrills in their short, violent lives. One of the major gangs - Grimm's Reavers - have just been catastrophically wiped out by their rival, The Falcons. This has left a huge power vacuum and in the wake of this gangs' demise, dozens of small-time gangs have sprung up, eager to carve out a slice of territory for themselves, while avoiding the ire of the far more established and powerful gangs.
With the Hive seemingly set to tear itself apart in the near future, a thriving black market exists, with the military hardware that the PDF never has cause to use being regularly sold to the lower hive. Even the nobles have a hand in it, vying to increase their own standing in the city while there is still time. Meanwhile at the very bottom, the scum are more or less blissfully unaware of the impending stagnation of their entire city. They just keep on mining the ore and killing each other, and the Imperium doesn't even notice.
Hive Ulysses. Five years after the Big Black incident and the gang war that saw the downfall of the Falcons. Many new gangs fought viciously to secure dominance, but in the end all were scattered or destroyed. Such is life in the underhive: few manage to grasp power and even fewer manage to hold onto it. Legends were made in those days, for life is short and violent for a ganger in the underhive. Before long, even legends fade from memory as new upstart gangs and their rivalries become the talk of the town and the old are swept aside.
You are a member of one these gangs - the Crimson Vipers. You may have been with the gang since its humble beginnings three years ago or you may have joined more recently, eager to make a name for yourself. You may even be a veteran of the last gang wars, your comrades lost and forgotten. Either way, your characters have been together for some time through victories and defeats.
There are many new gangs stalking the streets:
Krom's Krusherz, savage killers and chem dogs.
Bloody Fang, originally formed by the remnants of the Falcons after Jaeger Ravion was killed, led by one of his lieutenants. Their current leader, Stavos Grimm, gained notoriety for tearing his predecessor's throat open with his teeth. They augment their bodies with bionics to tear their enemy apart. Stavos claims to be the nephew of the infamous Grimm, long-dead leader of the once feared Grimm's Reavers gang defeated by Jaeger Ravion's Falcons. No one knows the truth and it matters little, for Stavos has built a fearsome reputation of his own on the back of the legend of the Reavers and has taken up residence in the old territories of the Falcons.
The Reborn, a redemptionist cult who believe it is their divine duty to cleanse the underhive of corruption through the strength of their faith and fury.
The Shadow Gorgons, a mysterious gang who rarely engage in open combat and prefer to lay ambushes or sabotage their enemies.
The Skulltakers, an exiled gang of savages who are known for their melee prowess. When they launch their raids they leave a trail of butchered corpses behind, always decapitated. Rarely there are survivors who witness these vicious attacks, who claim that the Skulltakers drink their blood of their kills and enjoy slaughtering defenseless civilians. Many would argue those who survive such an attack are the unlucky ones. There is a standing bounty of 50 thrones per Skulltaker killed and a 300 throne reward for the head of their leader.
The Firebeards, a gang of ab-human squats famed for their brute strength, affinity for excavating old hab domes for archeotech and their homebrew beer that fuels their week-long parties.
Greenskins - no one knows quite where they came from or how they got into the underhive, but recently there have been reports of roving xenos gangs raiding the settlements, butchering hivers and running off into the wastes with their loot. They are extremely dangerous.
Recently, Bloody Fang has made a brutal push into Crimson Viper territory in a relentless series of attacks that culminated in an all-out assault on the Viper base - an abandoned hab stack at the edge of town. This battle ended with the gang slaughtered or scattered. The battle was over the moment Stavos Grim defeated the Viper leader, Double-tap Trix, ripping her throat open with his bionic jaw and throwing her mangled corpse from the top of the building.
You are the last survivors of the defeated Crimson Vipers. Will you try to rebuild your gang and take revenge? Or start over with a new name and let the past die? Perhaps, in desperation, you turn to one of the other gangs and ask to join them for the sake of your own survival, foregoing the former glories of the Vipers as lackeys for one of the other top dogs. The choice is yours. All you know is the last friends you have are by your side and for the time being, everyone thinks the Crimson Vipers have been killed to the last man. You have temporary anonymity, but you know that the moment Bloody Fang learns you still live, there will be a target on your backs.
Maps of the Underhive & Settlements

"..And lo, they beheld the admin's mastery of paint and they did cower in fear."
Legend:
Blue lines - relatively safe tunnels you can travel through
Red lines - Falcon tunnels, guarded at the Falcon end and occasionally used by their gangers
Black area - outside of the relative safety of the domes and tunnels are the pitch-black wastes. Very few choose to live out there and it is mostly habited by mutants, monsters and outlaws. There are also potential treasures to be found in the wastes, most notably in the form of long-lost domes from eras past that have collapsed or been abandoned. Such ancient places usually hold vast riches and artefacts, but the chances of finding one, let alone surviving to reach and plunder it, are very low.
Blue areas - former territory of Grimm's Reavers, now uncontrolled areas with new gangs vying for dominance over them. These are the habitable domes - major settlements.
Major Settlements - these are where your gangs can make their base of operations and claim their first territories, but you won't know what territories are available until after your gang has moved in and been able to get the lay of the land. Once you've picked, there are no take-backs, even if you are unsatisfied with the territories you get! They are all randomly generated.
Red areas - these settlements were formerly under the control of the Falcons, each one typically overseen by a dozen or more of Jaeger Ravion's men. They are prosperous settlements, particularly since the Falcons defeated Grimm's Reavers and looted almost everything of value from their old territories. Now, they are little more than ruins from the last gang war that saw Ravion killed and his territories reduced to rubble by the fighting. These hab domes are rebuilding but have little of value.
----------------------------------------
F: Stands for Freedom. For gang leaders who aspire to one day escape the underhive, the large service elevators - used for the bulk transportation of raw materials for processing in the upper hive - are the only way out.
----------------------------------------
I: Farville [The Firebeards]
On the edge of the sector, the aptly named Farville is the last stop for treasure hunters and outlaws alike before heading out into the truly perilous areas of the underhive. It is an average-sized settlement and its people are generally self-sufficient, independent of 'the circuit' as much as possible. Of course, it is not the safest place to live. Sometimes things come from the outgoing tunnels in the night, things that aren't human, and come dawn leave a bloody trail in their wake. It does have a direct tunnel to Gelttown, but typically its inhabitants don't venture there except for necessities meaning it isn't patrolled. That makes it a long and dangerous journey, but for gang leaders it is usually worth the risk if they want to avoid confrontation with multiple rivals just to get to the Trader Outpost.
----------------------------------------
The Circuit Settlements
These settlements were mostly established at the same time, forming rough districts of a larger whole. They have well-travelled tunnels connecting them, and several smaller hubs have since sprung up in their wake, making this a densely populated and well-known caravan route. Their high accessibility makes them hot-spots for gangs who like to be able to get around and feth up each other's business, however the proximity to Falcon territory in the South Eastern areas make them a perilous area to inhabit indeed.
Still, for those who are willing to risk the attention of the Falcons, they can prosper greatly and also can find the nearby top dogs pose just as much of a danger to other gangs that might trespass on their turf.
These districts, while relying on each other, have infamous rivalries. As the oldest settlements in the sector, they have all manner of hap-hazardous structures both ancient and new built on top of each other. These rivalries often carry over to their gangs, who usually grew up in one of the Circuit towns, and to support a gang from a rival settlement is a street taboo of the very worst order.
The original four Cirsets form the four compass-point districts. They are busy travel hubs and connect to many other settlements.
II: North Cirset
III: East Cirset [Formerly Crimson Vipers, now owned by Bloody Fangs]
V: South Cirset
VII: West Cirset
There is also an old competition known as the Death Races that involves making several laps of the Circuit, typically with a representative from each of the four Cirsets. However, with so many other new settlements having been founded around the original Circuit (which many consider aptly named for the races) there are usually competitors from all over the sector. While there are often regular races scheduled between individual groups, the grand tournaments are a much less regular event, originally an annual event, but now they take place whenever the Guild Emporium decides they do.
Death Race: If you wish to organise a Death Race against another gang, then it would be wise to speak to the Guild. They will gladly oversee the proceedings to ensure all bets and winnings are received correctly, and oh, they will be rather displeased to be cut out of an event that has its basis in the Grand Tournaments they host. For a small cut of the proceedings, you can ensure your race is fairly managed and that the Guild doesn't end up annoyed at your gang.
----------------------------------------
IV: Solstar [The Reborn]
Solstar is one of the few settlements that it can only be reached via a single tunnel, which is both risky and useful for any gang taking up residence here. Its location makes it the second most isolated of all the settlements, despite being directly in the middle of the Circuit, something that the Falcons originally used greatly to their advantage when bringing about the downfall of Grimm's Reavers. But if you put your back up against a wall, you best be prepared to hold your ground. Overall, it's a highly strategic location, but something of a gamble to put up shop here.
----------------------------------------
VI: Little Gelt, or just Downtown
Quite possibly the single most important settlement in the Circuit, despite only having been founded some centuries ago by long since forgotten settlers, it has access to every corner of the Circuit as well as the shortest, safest route to Gelttown. The Long 88 runs through the heart of the Circuit, with several secure outposts along the way, meaning only Solstar is not directly accessible from this travel hub. It has its weaknesses however, as it also means that the other settlements can just as easily reach it through the same routes and it is also not the largest, functioning as little more than a rest stop for travellers and a slum for those too poor to live in Gelttown.
----------------------------------------
IX: Scrapton [The Shadow Gorgons]
This is the most isolated settlement of them all. While from a gang leader's point of view, it has the advantages of being far from the territories of other gangs and is very close to Gelttown, it does have its disadvantages. For one, it leaves the gang boxed in. Secondly, being on the edge of the sector, it is prone to mutant or scav gang raids, much like Farville. It is also relatively small and got its name because, well, everything is made of scrap.
It was founded by people from the Cirsets who were either kicked out or wanted to leave and they dragged every single piece of unwanted material with them to build this new home. While it isn't very prestigious and would seem like a dead end, this small town has potential.
----------------------------------------
X: Grim Town [Krom's Krusherz]
Right in the center of the Cirsets is Grim Town. It used to have a different name, but the leader of the Reavers renamed it in his own honour and even had a great scrap statue of himself constructed in the middle of town. Jaeger Ravion left it standing after he defeated his rival, as a reminder to everyone what happens when someone thinks they can challenge him.
The statue is now heavily defaced, although occasionally a hooded figure or two may visit it in the dead of night to pay respect. Perhaps they are former members of the Reavers who managed to not get absorbed into the Falcons, or perhaps Grimm had secret relatives that the Falcons didn't know about when they executed the rest of them.
Occasionally prospective Gang Leaders make a short pilgrimage of sorts to see it. Some are inspired, knowing that they stand where one of the most powerful gangs of all time started out. Perhaps they think they can do better.
It's not hard to see why the Reavers did so well, either. This settlement is in the middle of everything, with access to four other settlements as well as Gelttown. Furthermore, something that certain leaders might consider even better is that it also doesn't have to deal with the sheer traffic of Downtown, while retaining a similarly high level of accessibility.
It's also very defensible with only two tunnels coming from one direction to worry about, meaning that cunning gang leaders will always have an escape route.
XI and XII: Gammerville & Ulysses Arse
Crudely named after the ice ball Hive Ulysses has its claws embedded in, or perhaps because it's gammy, this good-sized settlement forms something of a symbiosis with the smaller nearby town of Ulysses Arse. The pair have a long history of friendship together, enabling them to prosper amongst the many other superior settlements. However, if rival gangs ever set up shop next to each other, it could bring that to an end. They are also a constant nuisance for East Cirset, who have always seen them as stealing trade off them.
Bloody Fang territories [formerly Falcon territory]
XIII - Throne City
A large settlement that is often considered an inferior rival of Gelttown, its hard-working people have forever been jealous of the underhive's golden settlement. In fact, over the generations it would appear the denizens of TC have a bitter grudge. It boasts such attractions as the Silver Penny, the Sell-Sword's Union and the defunct sister of Big Black, Large Dark. Throne City has become the home base of the Bloody Fang.
XIV - Madley's Mope
A small settlement where not a lot goes on, it is full of dead end bars and people drinking their sorrows away. Why miserable people choose to congregate here is anyone's guess. Local legend has it a man named Madley was so miserable and got so sick of other people that he founded his own settlement just for himself.
When other people began moving there en masse, he bought a shotgun and went on a killing spree. Some say he still stalks the streets in the dark, preying on the vulnerable. Others point out that it's probably just the Falcons.
XV - Grimfall
This small settlement is where Grimm met his grisly end. It suffered a lot of damage in the final reckoning and for some time became a ghost town. Now, people are starting to return.
XVI - Atro City
The former seat of power of The Falcons, this is where Jaeger Ravion had his 'palace' built. While it is a hilarious mockery of the luxurious hive spires, it is the equal of the imposing Guild Emporium so lovingly maintained by Lady Thebe in Gelttown. However, the leader of the toughest gang in the underhive doesn't succumb to comfort easily - Falcon headquarters was a veritable fortress built over the bodies of the slave gangs that died from exhaustion constructing it. Atro City was ravaged in the last great gang war and Ravion's fortress now sits as an empty ruin.
XVII - Scumtown
This nasty little settlement sits in the figurative shadow of Atro City like a leech, preying on the weak and profiting from the scraps leftover from the Falcon's endeavours. It is considered bad luck in Scumtown if at least one of your friends isn't murdered every couple of months and superstitious scummers fear that they may be the ones who are next. These paranoid junkies then tend to go out and murder someone to make themselves feel better. Somehow, this parasitic self-destructive town manages to survive, if not prosper.
XVIII - Sludge Harbour
This settlement is on the edge of a vast septic tank system of behemoth proportions. Many believe it was originally a farming settlement - the effluent from the tanks ensured a relatively fertile farming environment and fairly bountiful fungus harvests. Even today tiny holdings make limited use of this 'natural' resource. As the farming communities grew larger, Guilder Caravans began to take detours from established routes to trade.
The settlement then grew more centralised for mutual defence. It truly became an established trade hub when a local came up with the idea of providing safe transport for the caravans by ferrying them across the sludge, safe from outlaws.
Extensive rebuilding of the 'seafront' area of town yielded workable dockyards and ferry-barges were constructed fairly easily. Similar construction projects were commenced at other coastal communities in the area, amongst them Port Stink, Slurry Docks and Slim Cove, creating a long ferry-route. As a result, those travelling through Sludge Harbour can do so relatively safely until they get off at the other side of the Sludge Sea. That is, of course, unless they fall into the toxic water (if it can even be called that).
XIX - Martyr Town
During the Guilder Tax riots over three centuries ago, it is said a man migrated downhive with his family to find a more peaceful life. He happened upon a rich ore vein and made a huge profit, causing hivers to flock their in scores to get in on the spoils. The details of the story differ with every retelling, but the one constant is that this local hero who brought riches to the labouring masses had a bounty put on his head by the Guild. Hired guns rolled into town one day and took his head.
In response, the people of Martyr Town rose up and murdered the hired guns. Although the town was later restored to order and begrudgingly accepted Guild control after they blockaded them for three weeks, even to this day the masses resent the Guilders.
XX - Reliance
This remote yet large settlement is renowned for the large semi-circle metal construct that rises nearly as high as the dome roof. It is also full of notably self-reliant people who shun outside help. In fact, some say Farville was founded by settlers who originally lived in Reliance.
XXI - Plosper
Folk tales say this settlement was a great trade hub thousands of years ago when the hive was first established, until it was overshadowed by Gelttown and its prosperity was lost. Now it is a black hole - very little happens in Plosper and most people there are just passing through, to and from Gelttown.
-------------------------------
VIII: Gelttown
Gelttown, or the big TT of the underhive as some like to joke, is the largest hub in the sector. Amongst its important landmarks are the Guild Emporium, where the richest in the underhive do business, the Enginseer's Worskhop where the only serviceable vehicles can be bought, and the Trader Outpost where just about anything can be bartered on the Black Market, for the right price.
This is the closest place to sacred ground for the gangs that can be found. It is both out of respect for tradition, fear of the Guilders and by necessity, violence is forbidden here. Anyone who starts trouble is likely to have Guild Enforcers - mostly consisting of former soldiers and hive police - on their case. Other sanctions exist, such as bounties being put out or worst of all: being declared outlaws by the powers that be and either killed or chased out of the settlements for good. Most gangers consider it better to be dead than to be an outlaw.

Character Creation
You may have your character be a Heavy, but they MUST have a minimum strength of 4. They gain access to both heavy weapons and the heavy weapons skills. You may not retroactively become a Heavy once the game begins.
You may also choose to have your character be a Squat. They must have a minimum of S4 and T4. There is no impact on statistics or functionality in combat. It's just fun.
While a gang might be a loose collection of allies with a varying concept of loyalty, there is one singular truth which binds them together and encourages them to watch each others backs: safety in numbers. Life in the underhive is harsh and sticking together is the best way to ensure you live one more day. When two gangers have a disagreement that turns violent, the gang leader is usually content to let them have their petty rivalries rather than be so united they might revolt, but generally steps in before things get out of hand - after all, your gangers killing each other only benefits your enemies.
Despite this, some gangers are close friends or even family, whether they were initiated into the gang together or just struck up a bond over time, there will always be those that watch each other's backs out of genuine loyalty or love.
Every player in this RPG may have 1-3 characters. You have the equivalent of 300 thrones to "hire" your characters and equip them with items from the common items list. This represents a mixture of whatever gear they had on them when they escaped the death of the gang's leader or precious items they looted from the old base on the way out.
There are different base profiles and costs depending on the types of characters you want to have. Note: only characters with the 'specialist' skill can use special weapons and only Heavies can use heavy weapons. Any leftover Thrones from character creation are kept as pocket change. Once one of the characters is elected or asserts themselves as the new leader, they will be responsible for managing the funds of the gang and all income collected goes into the control of the gang leader, stored at your base. It is wise to always leave at least a few characters guarding your base and money.
A character must have a minimum LD value of 7 or higher to be considered suitable to become the leader. The benefit is that all other characters get to use their LD value in a fight for morale tests or bottle tests, provided that the leader is present.
Juves - 20 Thrones
The least experienced and youngest members of the gang.
Starting Rank: Green Juve
Starting XP: 0
Free stat advances or skills: 0
Stats:
WS: 2
BS: 2
S: 2
T: 3
W: 1
I: 2
A: 1
LD: 5
Gangers - 40 Thrones
The bread and butter of any gang. They've been around the block and can handle themselves.
Starting Rank: Ganger (Rank 3)
Starting XP: 51
Free stat advances or skills: 3
Stats:
WS: 3
BS: 3
S: 3
T: 3
W: 1
I: 3
A: 1
LD: 6
Heavies - 60 Thrones [max 1 per player, max 3 per gang]
The biggest, strongest members of the gang with enough of a brain to perform weapon maintenance on their big guns and keep the gang's equipment functioning. Can use heavy weapons and heavy skills.
Starting Rank: Ganger (Rank 3)
Starting XP: 51
Free stat advances or skills: 3
Stats:
WS: 2
BS: 3
S: 4
T: 3
W: 1
I: 2
A: 1
LD: 6
Gang Champion - 100 Thrones
A veteran of gang war, they are some of the most dangerous, cunning killers in the underhive.
Starting Rank: Gang Champion (Rank 4)
Starting XP: 121
Free stat advances or skills: 5
Stats:
WS: 3
BS: 3
S: 3
T: 3
W: 2
I: 3
A: 1
LD: 6
Squat ganger - 300 Thrones
A stranded Votann warrior who has been forced to adapt to the local culture to survive, they are tough and experienced individuals. They start with a boltgun and a suit of void armour (3+ save).
Starting Rank: Gang Champion (Rank 5)
Starting XP: 150
Free stat advances or skills: 0
Stats:
WS: 4
BS: 4
S: 5
T: 5
W: 1
I: 3
A: 2
LD: 7
Stat explanations (Juve stats example)
WS: 2
Your Weapon Skill is added to your attack role in close combat to determine your combat score. Your attack roll is a number of D6 rolled equal to the number of attacks you have. The difference between the combat score of the winner and loser is the number of times the loser is hit. If the attacker is using two weapons, each alternate hit is done by each weapon.
BS: 2
Ballistic skill determines your chance to hit an enemy with a ranged weapon
BS 1 = 6+
BS 2 = 5+
BS 3 = 4+
BS 4 = 3+
BS 5 = 2+
BS 6 = 2+ / 6+ second chance
BS 7 = 2+ / 5+ second chance
BS 8 = 2+ / 4+ second chance
S: 2
Your strength determines your chance to wound your opponent in melee when compared to the opponent's toughness. Lower S than T requires a 5+ to wound. Equal S and T require a 4+ to wound. A higher S than T requires a 3+ to wound. If S is double or higher than the T then a 2+ is required to wound. If the T is double or higher than the S then a 6+ is required to wound. For example a strength 8 attack against toughness 4 target is a 2+ to wound. A strength 3 attack against tougness 5 would be a 5+ to wound. A strength 4 attack against a toughness 4 target is a 4+ to wound etc. A teenage Juve is strength 2, a fit character is strength 3, strength 4 is exceptional and strength 5 is the physical peak of the human body. S5 characters are bulky and enemies get +1 to hit them. Most gangers are S2 or 3, relying on skills or weapons to increase their S in close combat. Only the most ferocious and experienced gangers live long enough to become the strongest and most deadly fighters of all.
T: 3
Toughness determines how easily your character can resist injury. See above. Frail humans may have T2 but this is rare. T4 or 5 represents exceptional endurance.
W: 1
Each wound represents how much damage your character can sustain before having to check if they get injured. When you lose all your wounds, you may suffer a flesh wound which reduces WS and BS by 1 until the end of the fight. In this case the character remains at 1 wound remaining until the end of the fight or if they lose it again and go down or out of action. Most NPCs just have 1 wound. As most common weapons only deal 1 point of damage per attack, it is very useful to have 2 or 3 wounds to keep your ganger in the fight for longer. After every fight, the ganger regains their full wounds total before the next fight.
I: 2
Initiative determines your character's reaction time and speed. It is a situational characteric, such as when a close combat is tied, the highest initiative wins. It is also important for putting yourself out if you catch fire, avoiding being knocked down and to spot enemy infiltrators when you are on guard. Most importantly, initiave decides the order in which characters can act in combat. At the start of combat all characters roll a D6 and add their initiative, with the highest result going first. Ties are won by the character with the highest natural I stat. In the case of another tie, a D6 is rolled, with one winning on a 1-3 and the other on a 4-6.
A: 1
The number of attacks you have means you roll that many dice in close combat to determine your combat score. You pick your highest attack dice value and the difference between that and your opponent's combat score determines the number of times you hit your opponent. More attacks means more chances of rolling higher than your opponent. If the enemy can parry, they can force you to re-roll your highest attack dice (usually activates on a 5 or 6) so having many attacks mitigates parrying by increasing your chance of high rolls.
LD: 5
Your leadership represents your characters natural charisma and willpower. It is important to resist the effects of Fear tests, morale tests and bottle tests. If more than half of your allies go down in a fight, 2D6 is rolled. If the score is higher than your leadership, your character loses their nerve and runs for cover. If a 12 is rolled, your character flees the fight by any means necessary as survival instincts take over. For example, if only 2 characters are in a fight, one going down will not be enough to trigger a morale test. If 3 characters go into a fight and 2 go down, the last one will have to take a morale test.
In terms of equipment, each character has 150 Thrones to 'spend' on equipment representing whatever they managed to escape their base with. Any unspent Thrones is kept as personal funds. All weapons and equipment must be selected from the 'standard weapons/equipment' list further down. Your character may not start with more than 4 weapons and can only have 1 piece of armour.
All weapons have different stats, benefits and disadvantages detailed later. Generally speaking, las weapons are reliable but not very strong, autoguns sit somewhere inbetween and bolt weapons are powerful but unreliable. This is because every time a shooting attack is made, there is a chance you will have to make an ammo roll which could result in the weapon becoming unusable.
Melee weapons have various benefits, such as swords being able to parry and other weapons adding a strength bonus for example.
Detailed weapon profiles can be found further down.
Gang member sheet:
Name:
Gang Name:
Age:
Gender:
Rank: (see the experience section)
Personality:
Appearance:
Background:
Weapons:
Armour:
Experience Points:
Skills:
-
-
-
-
-
Stats:
WS: 2
BS: 2
S: 2
T: 3
W: 2
I: 2
A: 1
LD: 5
Name: Korbo Quick-draw
Gang Name: The Rowdy Boys
Age: 23
Gender: male
Rank: gang champion rank 2
Personality: greedy, arrogant, aggressive
Appearance:
Background:
Weapons: knife, laspistol, autopistol, stub revolver
Armour: Flak armour
Experience Points: 100
Skills:
- Gunslinger (fire two pistols each turn)
- Rapid Fire (fire 1 weapon twice if standing still)
Stats:
WS: 3
BS: 4
S: 3
T: 3
W: 2
I: 4
A: 1
LD: 5
Name: Jess
Gang Name: Bladedancers
Age: 24
Gender: female
Rank: gang champion rank 2
Personality: boisterous, reckless, mischievous, playful, sadistic
Appearance:
Background:
Weapons: autopistol, chainsword
Armour: mesh
Experience Points:
Skills:
- Step Aside (5+ dodge in melee)
- Disarm (4+ enemy drops 1 weapon)
-
-
-
Stats:
WS: 4
BS: 2
S: 3 (4)
T: 3
W: 2
I: 3
A: 3
LD: 5
Sv: 5+
Name: Big Bob
Gang Name: Ironsides
Age: 27
Gender: male
Rank: gang champion rank 2
Personality: reserved, introspective, irritable, curious
Appearance:
Background:
Weapons: heavy stubber, knife, axe
Armour: metal armour
Experience Points:
Skills:
- Bulging Biceps
- Armourer
-
-
-
Stats:
WS: 2
BS: 4
S: 4
T: 4
W: 3
I: 2
A: 1
LD: 5
Sv: 6+
Name: Jack
Gang Name: The Average Joes
Age: 25
Gender: male
Rank: gang champion rank 2
Personality: cautious, suspicious, unfriendly
Appearance:
Background:
Weapons: lasgun, knife, stub pistol
Armour: flak armour
Experience Points:
Skills:
- Dodge (6+ dodge Sv to all attacks)
- Hard as Nails (+1Sv)
- Feel No Pain (6+ ignore damage)
-
-
Stats:
WS: 3
BS: 3
S: 3
T: 3
W: 2
I: 3
A: 1
LD: 6
Sv: 3+
XP determines the overall skill of your ganger, their 'rank' in the gang hierarchy and generally represents how skilled they are. The more XP a ganger earns, the faster they will increase in rank which will allow them to improve their skills and stats.
These are the usual ways of getting XP, although I may reward XP for other things, where appropriate, such as random events.
Action/XP
Kill an enemy ganger or juve - 3XP
Kill an enemy heavy, champion or hero - 5XP
Kill an enemy gang leader - 10 XP
Kill a mutant - 10XP
Kill a monster - 10XP
Kill a legendary mutant or monster (e.g. scrapworm matriarch) - 20XP
Kill a xenos - 15XP
Kill a legendary xenos (e.g. ork boss) - 20XP
Survive a battle without going Down or Out of Action - 5XP
Badass of the Battle award (one ganger only, justification required) - 5XP
Participate in a victory - 5XP
Triumphant Leadership (Gang Leader only) - 10XP
Win a single combat against an enemy with WS4 or higher - 5XP
Free a prisoner held by the enemy - +15XP
Successfully conquer or defend a territory or base - +15XP
Destroy an enemy vehicle - +10XP
The XP/Rank track is as follows:
0-5 Green Juve
6-10 Juve rank
11-15 Juve rank
16-20 Top Juve
21-30 New Ganger
31-40 Ganger rank 1
41-50 Ganger rank 2
51-60 Ganger rank 3
61-80 Gang Champion rank 1
81-100 Gang Champion rank 2
101-120 Gang Champion rank 3
121-140 Gang Champion rank 4
141-160 Gang Champion rank 5
161-180 Gang Champion rank 6
181-200 Gang Champion rank 7
201-240 Gang Hero rank 1
241-280 Gang Hero rank 2
281-320 Gang Hero rank 3
321-360 Gang Hero rank 4
361-400 Gang Hero rank 5
401+ Mighty Ganger (May not advance further)
Every time the character levels up a rank, they gain either a characteristic advance or a new skill. This is done by me making a roll on the advances table to determine the result.
2D6 - Result
2-4 - New Skill (choose from any skill table and randomly generate one)
5 - Characteristic Increase (roll again: 1-3 = +1 Strength; 4-6 = +1 Attack)
6 - Characteristic Increase (roll again: 1-3 = +1 WS; 4-6 = +1 BS)
7 - Characteristic Increase (roll again: 1-3 = +1 Initiative; 4-6 = +1 Leadership)
8 - Characteristic Increase (roll again: 1-3 = +1 Wounds; 4-6 = +1 Toughness)
9-10 - Choose any 1 skill.
11-12 - Choose any characteristic to add +1.
Minimum values: a characteristic may never be reduced below 1 no matter what.
Maximum values: (these are not scaled normally with 40k stats, so you cannot be stronger than a space marine)
WS: 8
BS: 8
S: 5
T: 5
W: 5
I: 6
A: 6
LD: 10
Skill tables that you can choose from:
- Agility
- Melee
- Stealth
- Strength
- Ferocity
- Special
- Shooting
- Heavy (Heavy only)
- Leadership (Leader only)
SKILLS
AGILITY SKILLS
1: Catfall
If the ganger passes an initiative test, they have rolled out of the fall and do not take damage. Falls from too high will still automatically take the ganger out of action.
2: Dodge
Gain an additional 6+ saving throw in addition to any others against shooting or hand-to-hand damage, and can never be ignored. However it cannot be taken against blast or flame weapons.
3: Jump Back
At the start of any melee fight the character can take an initiative test to safely disengage, exiting the fight without incident and moving several steps away from the opponent. If failed, the fight continues normally.
4: Leap
The ganger can take an initiative test to make leaps. If passed, they can leap over another person, or cross the distance between two building roof tops or any man-height obstacle, etc. If they fail the test then one of several things happen. If it's another person then that person takes a hit equal to the strength of the leaper. If they are jumping over a height, they will fall and take fall damage as normal. If they are leaping over any other normal type of object then they simply take a single Strength 3 hit as they fall.
5: Quick Draw
This lets you double your initiative when testing to fast draw in a stand off or similar situation. They can also switch to melee/pistol weapons in time before a charge if they are using a basic or special weapon beforehand.
6: Sprint
The ganger is extremely fast and can cover up to three times the distance as normal when running or charging. Sprinting characters may not shoot or charge that turn but enemies suffer -1 to hit them.
MELEE SKILLS
1: Combat Master
If outnumbered in melee, the character gains +1 WS for every opponent over the first.
2: Disarm
The character can use this in close-combat and on a D6 roll of 5+ the opponent drops one weapon of your choice. If the disarming fighter takes his opponent down or out of action after successfully disarming them, then the disarmer gets to keep the weapon. If the opponent puts the disarmer down or out of action then they automatically retrieve their weapon.
3: Feint
The character can convert any parries it is allowed to make (typically only sword-type weapons) into +1 attack per parry available. You can only feint or parry in each turn and must decide which. Usually the maximum number of parries available will be two, if the fighter has one weapon in each hand that allows a parry.
4: Parry
The character has learned to parry even with weapons unsuited for such a move, perhaps even turning aside enemy weapons with his bare hands. If they also have a weapon like a sword that can parry then they can make their opponent re-roll an additional dice (or the same dice twice). This skill means that if the opponent also has a parrying weapon then they automatically cancel out, even if the character with this skill has no weapon or a weapon that can't usually parry.
5: Counter Attack
In combat, when both sides can make a parry they cancel out, but with this skill the character can immediately roll an extra attack dice when this happens.
6: Step Aside
The character is an expert at avoiding CQC attacks. In melee, they ignore any blows that hit them on the roll of a 5+.
STEALTH SKILLS
1: Ambush
The character is capable of concealing themselves, lying in wait and attacking other gangers from an unexpected angle. They roll initiative at the start of combat like everyone else, but on the first turn they automatically go first and then use their initiative score in subsequent turns. If two characters have Ambush, the one with the highest I goes first. If it is a tie, they flip a coin (50% chance).
2: Night Owl
Enemies suffer -3 to hit this character with ranged weapons during night fighting rather than just -1.
3: Escape Artist
If the character is ever captured after a battle, then they immediately escape with all of their equipment on a roll of a 2+.
4: Evade
Ducking and weaving, this character is notoriously hard to hit. Enemies shooting at him at suffer a -1 to hit them. This only applies if the fighter is in the open, and does not stack with bonuses from cover, night fighting or anything else other than debuffs the enemy is suffering such as a flesh wound.
5: Infiltration
The ganger is adept at getting behind enemy lines. When trying to infiltrate an enemy base or territory, they are only ever spotted on an initiative test of 1.
6: Sneak Up
The character can make an initiative test and if passed then they make 1 free attack with a melee weapon against an enemy without needing to compare combat scores. If they kill the enemy then they remain undetected.
STRENGTH SKILLS
1: Body Slam
The ganger adds +2 to their WS when it charges rather than just +1.
2: Crushing Blow
The character counts as having +1 Strength in close-combat. If using a weapon like a powerfist, the +1 is added after the strength multiplier. E.g. S4x2=8+1=9
3: Head Butt
The ganger makes 1 extra attack in close combat at their natural S value (e.g. bionic arms or weapons or skills do not increase the S of the attack).
4: Hurl Opponent
If the character wins a combat, they can pick them up and throw them in a direction of their choosing. The thrown character takes a hit equal to their S+1. This can be used to throw them into solid objects such as walls, other gangers or most effectively - off a very high place like a walkway! They may not use any other weapons or make more than this one attack if they use Hurl Opponent.
5: Iron Jaw
If the ganger is hit in melee the strength of each hit is reduced by 1.
6: Strong Man
A fighter with this skill is pumped up enough to carry the largest melee weapons with a firm grip, using strength before agility in combat. They may use a single two-handed weapon in hand-to-hand combat as though it were a single-handed weapon, allowing the fighter to carry a Great Weapon in one hand and a pistol or club in the other hand, for example.
FEROCITY SKILLS
1: Berserk Charge
On a turn that the ganger charges they gain +1 attack, but cannot parry that turn even if they have the Parry skill.
2: Hard as Nails
The fighter is so tough and resistant that he gets +1 to any armour save, to a maximum of 2+, or a 6+ save if they are not wearing armour.
3: Feel No Pain
The ganger can roll 1 D6 for each point of damage they would suffer, after any armour or dodge saves have been made. On a 6+ they ignore the damage completely.
4: Killer Reputation
The ganger has such a fearsome reputation as a vicious, depraved psychopath that his foes are terrified at the thought of facing him. This causes a fear test if this ganger charges an enemy.
5: Nerves of Steel
The ganger automatically passes the first morale or fear test they have to make in each battle.
6: True Grit
The ganger ignores the first Out of Action result they suffer in each battle, instead suffering a flesh wound.
SPECIAL SKILLS
1: Chemist
A fighter with this skill might occasionally create some form of drug that might enhance their abilities before a fight.
Roll a D6:
1 - Poisonous. The ganger suffers -1 to all stats, to a minimum of 1, for this fight.
2 - Eagle Eye. +1BS
3 - Speed. +1 Initiative
4 - Steroids. +1 Strength
5 - Painkillers. +1 Wound
6 - Rage. Uses rules for Frenzy
2: Fixer
Gangers only. This ganger has a certain know-how or dubious contacts in the black market. They never reveal their secrets, but somehow they are much more easily able to get a hold of rare and vaunted items. You may choose any 1 rare item and send this ganger to work their contacts to try and find a special seller. Roll a d6:
1 - Catastrophe. The ganger asks the wrong people and is attacked. Immediately suffer a roll on the serious injury chart.
2-4 - Failure. The rare item is not available.
5-6 - Success! The rare item is available to be bought by your gang only.
3: Inventor
Occasionally this person might just cobble together something rather impressive. If they do, you're in for a treat...
Every week a D6 will be rolled. On the roll of a 6, you automatically get one free random piece of rare trade.
4: Medic
The ganger has some experience patching up fellow fighters. After a battle you can ask the GM to re-roll one serious injury result if you so desire. If the second roll is Death, this is re-rolled again but not a third time. Each Medic can only assist one other ganger in this way or themselves after each battle.
5: Specialist
The ganger has shown an affinity for the more complex weapons out there and can now use special weapons.
6: Weaponsmith
This ganger can ignore any failed jam/ammo and weapon explodes results on a 4+.
SHOOTING SKILLS
1: Crack Shot
This ganger can re-roll ranged attack results of 1. They may not do this more than once per shot.
2: Fast Shot
The ganger hits overwatch shots on a 5+ rather than a 6+.
3: Gunslinger
The ganger is best with pistols and can wield one in each hand, firing them both accurately at the same time.
4: Hip Shooting
The character can run and shoot in the same round, but suffers a -1 to hit. This skill cannot be used with heavy weapons. Gun sights are unusable while doing this and it is still impossible to run and shoot with weapons that only ever allow someone to move or shoot, such as heavy weapons.
5: Marksman
The ganger gains +1 to hit with rifles and sniper rifles to a maximum of 2+. List of eligible weapons: Stubgun, Autogun, Lasgun, Boltgun, Hellgun, Bolt-action sniper rifle, Long-las, Nomad Rifle.
6: Double-tap
The ganger makes sure his targets go down and stay down. Every roll of 6 to hit with a ranged weapon scores an extra hit.
HEAVY SKILLS (HEAVY ONLY)
1: Accuracy
The heavy is especially skilled with weapons that have a blast radius. Any weapon this fighter uses that has a blast radius counts any roll to determine number of 'shots' of a 1 or 2 as a 3. E.g. a Frag grenade rolls D3 to determine hits, and would always score 3 hits. A frag missile rolls D6 to determine hits, so would always score a minimum of 3 hits.
2: Armourer
The heavy meticulously checks all the weapons being used by the gang. Any fighter in the gang adds +1 to any ammo roll or roll to check if their weapon explodes. However, a roll of a 1 always fails.
3: Bulging Biceps
The heavy can move and shoot with a heavy weapon with a -1 to hit penalty. They can only walk, not run.
4: Long Shot
The heavy is skilled at making aimed shots with a heavy weapon. If the fighter only fires a single shot, then they will have a +1 to hit. This skill may not be used with any weapons such as flamethrowers or that explode in a blast radius, e.g. flamers and grenades.
5: Monkey Grip
The heavy has learned to use the substantial weight of their heavy weaponry in melee. In close combat, they can use heavy weapons as a great weapon.
6: Knock Back
In an attempt to disorientate their attackers in close combat, the heavy can attempt to knock them back with their heavy weapon before any attack dice are rolled. They must make a strength test and if they pass then the opponent suffers -2 to their combat score. If they fail, then their wide swing has missed and they automatically suffer one additional hit as well as any other hits their opponent may make. A roll of a 6 is always a failure.
LEADERSHIP SKILLS (LEADER ONLY)
1: Barter
The leader has a reputation for being a loyal customer with many of the local traders. When the leader visits the trading post, they will always be offered one random piece of rare trade that is not available to the other gangs.
2: Fence
The leader is known as a trustworthy source of good quality used equipment. Whether or not this is actually true, the leader can charge more for his secondhand equipment. Instead of receiving only 50% value of equipment he sells, he will receive the full market value.
3: Haggle
Your leader drives a hard bargain at the trading posts. When purchasing a piece of rare trade, you may re-roll the variable cost of the item. However, the second roll must be accepted, even if it is worse.
4: Informant
The leader has earned a trusted friend who can often give him useful or interesting information about past, present or future events or info, whether it is about other players, their territories, next week's rare trade, or perhaps even a hint at future plot developments that other players aren't privy to. The informant remains anonymous and only meets at a certain time at night to protect their own identity. The informant can be visited as many times in a week as the player wishes, and there is no penalty for the first time each week. However, each subsequent visit increases the risk that the informant is discovered and disappears after telling too many secrets. This starts as a 4+ and increases to a 3+, 2+ and then automatic with each subsequent visit.
5: Lead From the Front
If the leader is present, all characters gain +1 to Initiative rolls.
6: Iron Will
This skill allows the leader and any allies present to re-roll any failed morale checks as long as they are not down or out of action.
List of common weaponry and equipment:
Ammo rolls - a roll of 6 to hit means an ammo roll must be taken to see if the weapon has jammed or run out of ammo. If failed, it cannot be used for the rest of the fight. Each 'shot' represented by 1d6 roll to hit with a ranged weapon does not necessarily equate to a single bullet, simply the damage potential and whether or not a weapon has a high enough rate of fire to target multiple enemies. Weapons with sustained fire, blast rules or flamethrowers are the only weapons capable of hitting multiple enemies per turn.
Melee weapons:
Knife - 5
Range: Close combat
Strength: As user
Damage: 1
Save Mod: -
Special: can be thrown at short range as a ranged attack with the strength of the user.
Sword - 20
Range: Close combat
Strength: As user
Damage: 1
Save Mod: -
Special:
Parry - can force opponent to re-roll their highest attack dice. Two parrying weapons cancel out.
Club/maul/bludgeon/Axe - 20
Range: Close combat
Strength: As user +1
Damage: 1
Save Mod: -
Special:
Chain or Flail - 10
Range: Close combat
Strength: As user +1
Damage: 1
Save Mod: -
Special:
It is impossible to parry against a fighter armed with this weapon.
Fumble - because the weapon is so clumsy, every fumble made by the wielder confers +2 to the opponent's combat score rather than just +1.
Massive Axe, Sword or Club - 25
Range: Close combat
Strength: As user +3
Damage: 1
Save Mod: -
Special: -1 to WS, two-handed
Spear - 15
Range: Short / Close combat
Strength: As user
Damage: 1
Save Mod: -
Special:
Can be thrown up to short range. If it hits then it can no longer be used in melee until collected after the battle.
Shield - 15
Range: Close combat
Strength: As user
Damage: 1
Save Mod: -
Special:
Defensive - This weapon adds +1 to the user's armour save in close combat, or confers a 6+ save if they do not already have one. It is most effective when paired with another melee weapon. Due to its defensive nature, it does not add +1 attack when used with another weapon.
Wrist-blade - 15 (The same as a sword, except you can keep the hand free to use another weapon. If you go up against another enemy who has a weapon that can parry, it does not cancel out as normal, they get to parry and you do not as the wrist-blade is more awkward to use than a regular sword)
Range: Close combat
Strength: As user
Damage: 1
Save Mod: -
Special:
Poisoned knife - 35
Range: Close combat
Strength: user
Damage: 1
Save Mod: -
Special:
Toxic - this weapon always wounds on a 4+ regardless of toughness values.
Electro-whip - 45
Range: Close combat
Strength: user
Damage: 1
Save Mod: -
Special:
Shock field - any enemy who loses their last wound to this weapon automatically goes out of action. They can be automatically captured at the end of the battle if you choose, provided you won the fight. They will still suffer an injury roll as normal but re-roll any result of 'Death.' Once captured you can still just kill them if you captured them.
Cannot be parried
Chainsword - 50
Range: Close combat
Strength: user +1
Damage: 1
Save Mod: -1
Special:
Parry
Chain Axe - 60
Range: Close combat
Strength: +2
Damage: 1
Save Mod: -1
Special:
Shock Maul - 75
Range: Close combat
Strength: +3
Damage: 1
Save Mod: -
Special:
Shock field - any enemy who loses their last wound to this weapon automatically goes out of action. They can be automatically captured at the end of the battle if you choose, provided you won the fight. They will still suffer an injury roll as normal but re-roll any result of 'Death.' Once captured you can still just kill them if you captured them.
Riot Shield - 80
Range: Close combat
Strength: +1
Damage: 1
Save Mod: -
Special:
Confers +1 to all armour saves against ranged and melee attacks.
Eviscerator - 100
Range: Close combat
Strength: user x2
Damage: 1
Save Mod: -2
Special:
Parry
Two-handed
-1 WS
Pistols:
Note - Pistols can be used in melee. In this case they do not use BS, they attack in the same way as any other close combat weapon and do not get modifiers to hit based on range. They resolve damage normally. If you fumble with a close combat pistol attack, you make an ammo roll. A good Gunslinger doesn't neglect their WS!
Range - apart from flame weapons, any weapon can be used at short or long range. The range is simply a description of the weapon's effective range. Many pistols or rapid-fire weapons are much easier to hit at close range while rifles or snipers are generally more effective at long range. The trade off is pistols can be used in melee and heavy weapons make you more vulnerable to melee, with basic weapons sitting somewhere inbetween. Pistols also leave your off-hand free to use another weapon. Heavy weapons cannot be fired on a turn you move.
Stub pistol - 10
Range: Short
To Hit Modifiers: - short -1 long
Strength: 3
Damage: 1
Save Modifier: -
Ammo Roll: 3+
Special - Dum Dum Bullets. A stub gun can be loaded with dum-dum bullets. A supply of these hand-made bullets costs extra, but they are more powerful than standard ammunition. It adds +1S to the weapon but if an ammo roll is failed, the weapon automatically explodes.
Sawed-off Shotgun - 20 [comes with scatter shells, see shotgun shell types]
Range: Very Short
To Hit Modifiers: varies short -5 long (regardless of shell type)
Strength: varies
Damage: varies
Save Modifier: varies
Ammo Roll: varies
Special: May be used by fighters on Bikes. Sawed-off shotguns always suffer -5 to hit at long range regardless of shell type.
Stub Revolver - 25
Range: Short
To Hit Modifiers: - short -1 long
Strength: 4
Damage: 1
Save Modifier: -
Ammo Roll: 3+
Autopistol - 25
Range: Short
To Hit Modifiers: +1 short -2 long
Strength: 3
Damage: 1
Save Modifier: -
Ammo Roll: 4+
Hand Cannon - 30
Range: Short
To Hit Modifiers: - short -2 long
Strength: 5
Damage: 1
Save Modifier: -
Ammo Roll: 4+
Special: 2-handed
Laspistol - 35
Range: Short
To Hit Modifiers: +1 short -2 long
Strength: 3
Damage: 1
Save Modifier: -
Ammo Roll: 2+
Hand Flamer - 40
Range: Short/fire cone
To Hit Modifiers: D6 autohits on each target in range each time you shoot
Strength: 3
Damage: 1
Save Modifier: -1
Ammo Roll: Special
Special: the hand-flamer is a one-shot weapon. It can only be fired once per engagement. It cannot be used in melee like a normal pistol. Enemy takes an initiative test or they catch fire (a 6 always fails) and take an extra hit in addition to normal damage, and each turn they must keep taking initiative tests to put themselves out or keep taking damage.
Hellpistol - 60
Range: Short
To Hit Modifiers: - short -1 long
Strength: 3
Damage: 1
Save Modifier: -3
Ammo Roll: 4+
Bolt Pistol - 75
Range: Short
To Hit Modifiers: - short -1 long
Strength: 5
Damage: 2
Save Modifier: -1
Ammo Roll: 6+
Plasma Pistol - 90
Range: Short
To Hit Modifiers: - short -2 long
Strength: 7
Damage: 1
Save Modifier: -3
Ammo Roll: 4+
Special: a failed ammo roll on high power mode means the weapon overheats and the user takes 1 hit from the weapon. Can be overcharged to strength 8 and damage 2.
Basic weapons:
Rapid-fire - all basic weapons can make 2 attacks per turn instead of 1 at -1 to hit.
Stub carbine - 20
Range: Medium
To Hit Modifiers: - short - long
Strength: 3
Damage: 1
Save Modifier: -
Ammo Roll: 3+
Special - Dum Dum Bullets. A stub gun can be loaded with dum-dum bullets. A supply of these hand-made bullets costs extra, but they are more powerful than standard ammunition. It adds +1S to the weapon but if an ammo roll is failed, the weapon automatically explodes.
Shotgun (scatter shells default) - 25
Range: Short
To Hit Modifiers: varies
Strength: varies
Damage:
Save Modifier: varies
Ammo Roll: varies
Special: knock-back. The high impact of a shotgun is quite capable of knocking a person off balance or even off their feet. If a person is shot off the side of a high ledge their roll for falling is done at -1 initiative.
Scatter Shot shells:
Range: Short
To Hit Modifiers: +2 short -4 long
Strength: 3
Damage: 1
Save Modifier: -
Ammo Roll: 4+
Special: for every hit roll D3 rolls to wound.
Autogun - 50
Range: Medium
To Hit Modifiers: +1 short - long
Strength: 3
Damage: 1
Save Modifier: -
Ammo Roll: 4+
Lasgun - 65
Range: Medium
To Hit Modifiers: +1 short +1 long
Strength: 3
Damage: 1
Save Modifier: -
Ammo Roll: 2+
Hellgun - 85
Range: Medium
To Hit Modifiers: +1 short +1 long
Strength: 3
Damage: 1
Save Modifier: -3
Ammo Roll: 4+
Boltgun - 100
Range: Medium
To Hit Modifiers: - short - long
Strength: 5
Damage: 2
Save Modifier: -1
Ammo Roll: 6+
Special weapons:
Note - you can only use special weapons if you have taken the SPECIALIST skill. Ordinary gangers cannot use these weapons effectively. Without any kind of real training, affinity with unique or complex weapons is a rare talent.
Bolt-action sniper rifle - 70
Range: Long
To Hit Modifiers: - short - long
Strength: 3
Damage: 1
Save Modifier: -
Ammo Roll: 4+
Special:
Headshot - a roll to hit of 6 automatically wounds the target with a -2 save modifier.
Telescopic sight - re-roll a failed roll to hit
Long-Las - 105
Range: Long
To Hit Modifiers: - short - long
Strength: 4
Damage: 1
Save Modifier: -
Ammo Roll: 2+
Special:
Headshot - a roll to hit of 6 automatically wounds the target with a -2 save modifier.
Telescopic sight - re-roll a failed roll to hit
Stalker-pattern Boltgun - 160
Range: Medium
To Hit Modifiers: - short - long
Strength: 5
Damage: 2
Save Modifier: -1
Ammo Roll: 6+
Special:
Headshot - a roll to hit of 6 automatically wounds the target.
Telescopic sight - re-roll a failed roll to hit
Grenade Launcher - 30
Range: Long
To Hit Modifiers: - short - long
Strength: varies
Damage: varies
Save Modifier: varies
Ammo Roll: auto
Special: This weapon only uses grenades. You must buy a supply to last each battle. Special/rare grenades do not count as a supply and can only be used individually even in a grenade launcher.
Move or fire - because of its bulk and massive recoil, a fighter cannot shoot a grenade launcher if he moves.
Flamer - 40
Range: Short
To Hit Modifiers: D6 autohits per target every time you shoot (can hit multiple close targets for D6 hits each)
Strength: 4
Damage: 1
Save Modifier: -1
Ammo Roll: 4+
Special: An ammo test is required every time the flamer is fired regardless of the to-hit roll. There is a chance to set your target on fire if they are hit.
Plasma Gun - 140
Range: Short / Medium
To Hit Modifiers: - short - long
Strength: 7
Damage: 2
Save Modifier: -3
Ammo Roll: 4+
Special: A failed ammo roll on high power mode means the weapon overheats and the user takes 1 hit from the weapon. Can be overcharged, increasing strength to 8 and damage to 3.
Rapid Fire
High Impact
Meltagun - 200
Range: Short
To Hit Modifiers: +1 short -3 long
Strength: 8
Damage: D6+6
Save Modifier: -5
Ammo Roll: 4+
Special:
Heavy Weapons:
A note on heavy weapons and sustained fire: weapons with sustained fire dice can either be fired single shot, or roll a number of attacks per sustained fire value. These can then be resolved against the same target or multiple close targets. Every shot can generate an ammo roll on a 6 increasing the likelihood of running out of ammo/gun jamming early in the engagement but can decimate huge numbers of enemies. Also, you cannot move and shoot heavy weapons without certain SKILLS. They must be set up and braced (i.e. cannot be fired in a battle turn that your character moved - overwatch is very useful!)
Missile Launcher - 80
Range: Very Long
To Hit Modifiers: - short - long
Strength: as missile
Damage: as missile
Save Modifier: as missile
Ammo Roll: auto
Special: Missile Launchers must have a supply of missiles bought before each engagement and can only use one at a time, either krak (heavy duty anti-armour) or frag missiles (large blast anti-infantry). See the special ammo/grenades/missile section for cost/stats.
Heavy Stubber - 120
Range: Long
To Hit Modifiers: - short - long
Strength: 4
Damage: 1
Save Modifier: -
Ammo Roll: 4+
Special:
Sustained Fire: 3
Heavy Flamer - 150
Range: Short
To Hit Modifiers: D6+2 rolls to hit every time you shoot (can hit multiple close targets for D6 each)
Strength: 5
Damage: 1
Save Modifier: -2
Ammo Roll: 4+
Special: An ammo test is required every time the flamer is fired regardless of the to-hit roll. Can set target on fire. CAN be fired in the same turn that you move as it has no recoil.
Rotary Cannon - 250
Range: Long
To Hit Modifiers: - short - long
Strength: 4
Damage: 2
Save Modifier: -1
Ammo Roll: 4+
Special:
Sustained Fire: 4
Heavy Bolter - 275
Range: Long
To Hit Modifiers: - short - long
Strength: 5
Damage: 3
Save Modifier: -2
Ammo Roll: 6+
Special:
Sustained fire: 3
Heavy Plasma Gun - 285
Range: Long / Very Long
To Hit Modifiers: - short - long
Strength: 7
Damage: 4
Save Modifier: -5
Ammo Roll: 4+
Special: A failed ammo roll on high power mode means the weapon overheats and the user takes 1 hit from the weapon. Can be overcharged, increasing strength to 8 and damage to 6.
Blast: HPGs are essentially ordnance and they impact with a small blast radius. While not as large as a frag missile's detonation, it is far more deadly.
High Impact
Autocannon - 300
Range: Very Long
To Hit Modifiers: - short - long
Strength: 7
Damage: 2
Save Modifier: -3
Ammo Roll: 4+
Special: High Impact
Sustained Fire: 2
Man-portable Lascannon - 400
Range: Very Long
To Hit Modifiers: - short - long
Strength: 9
Damage: 6
Save Modifier: -8
Ammo Roll: 2+
Special: High Impact
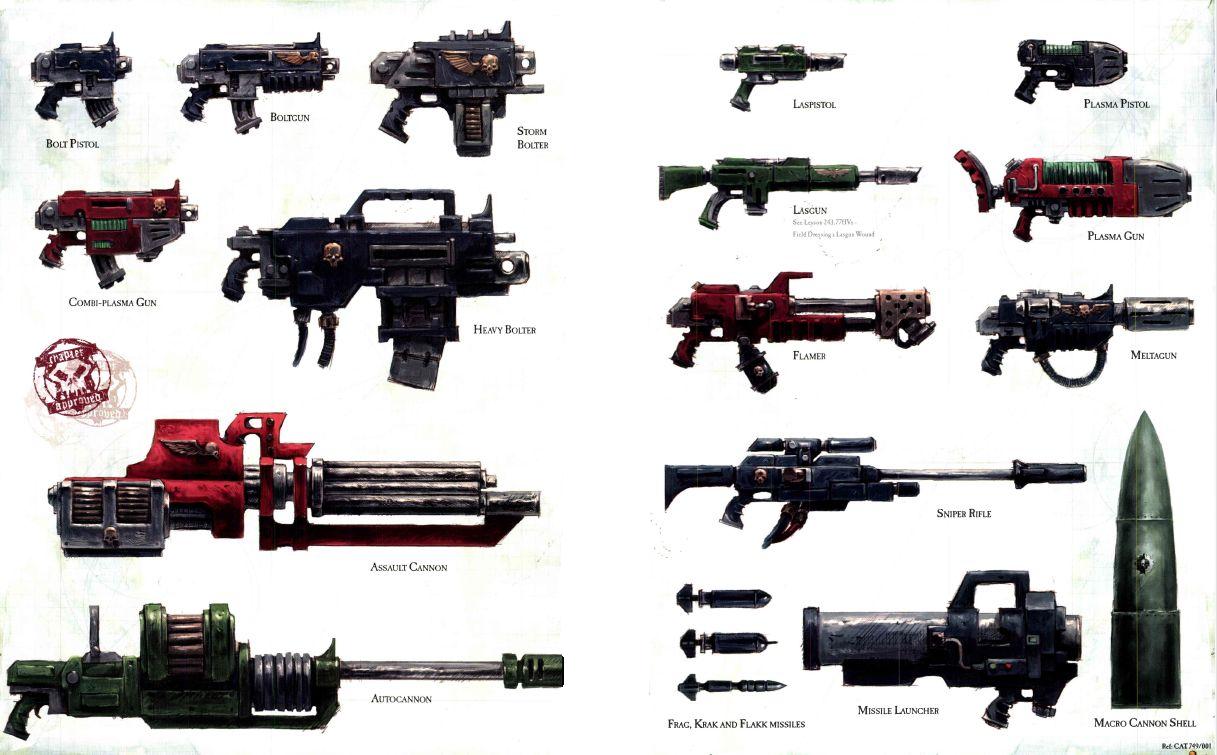
********High Impact
Weapons with a strength of 7 or more are high impact. People hit by them go out of action on a roll of a 4, 5 or 6 rather than just a 5 or 6.
Misc:
Clip Harness - 20
A safety line that can be attached to an appropriate nook, it allows the ganger to rappel down a building or fall off somewhere yet remain safe. The line can of course be cut by another person if they are close enough.
Photo-Visor - 20
A special visor that enhances vision in poor light conditions. They allow a wearer to re-roll failed initiative tests to avoid the effects of a photon flash flare and similar devices. A fighter wearing a photovisor can also see through smoke and shoot through it with a -1 penalty.
Respirator - 20
A person wearing a respirator can re-roll a failed toughness test to resist dangerous gases.
Com-bead set (enough for 10 people, locked to the same channel) - 50 thrones
One set has enough for 10 people and they are locked to the same channel. They can only be used within the same settlement due to their limited range.
Vox Caster - 30 thrones
This heavy radio set can only communicate with other vox casters or allow a set of vox beads to transmit throughout the entire underhive.
Silencer - 20 thrones
Can be fitted to a stub pistol, autopistol, stub gun, autogun or bolt-action sniper rifle. The weapon becomes almost completely silent.
Extra ammo - 10% weapon cost
The ganger carries extra ammo. This lets them re-roll a failed ammo test, at which point the extra ammo is used up. You can carry up to 3 extra ammo per character. Unused extra ammo is kept at the end of the battle.
Grapnel - 30 thrones
A magnetic grapnel attached to a long wire which is fired from a small launcher. You shoot it, it sticks to something and then it reels you in. It can also be used as a weapon if you are desperate.
Range: Short
To hit modifier: Short +2 Long +1
Strength: 2
Damage: 1
Save mod.: -
Ammo Roll: 6+
Medi-pack - 50 thrones
A medi-pack can only be used by a ganger with the Medic skill. A medic can use the medi-pack on a friend who is downed in a fight. They must spend some time working on them, and if uninterrupted then on a 1-4 the patient recovers to a flesh wound, on a 5 they go down and on a 6 they go out of action.
Screamers - 25 (one encounter)
These small devices are triggered when stepped on and they then sound an alarm. If an enemy gang is sneaking up on your base, then every time one of them moves there is a 4+ chance they will step on a screamer. The alarm will sound and the entire gang will be alerted to the intruders' presence.
Stummers - 25 (one encounter)
These devices are the opposite of screamers. When attacking an enemy base, intruders can spread these devices around. They absorb sound, cancelling out the effects of screamers if they are present.
Camo-cloak - 50
Your character does not benefit from cover normally. Instead, they are always at -2 to hit in cover. As normal this does not apply to blast weapons or flame weapons ignore hit modifiers. Also, enemies only detect them on an initiative roll of 1.
Gunsights
Red-dot laser sight - 50 thrones
A device fitted to the end of a weapon that traces a red light to where the shots will hit. Adds +1 to hit, can only be used on a pistol, basic or special weapon. Anyone shot at by one of these weapons gets a chance to 'spot the dot' and on a D6 roll of 6 they avoid the shot entirely.
Mono Sight - 30 thrones
A small optical device worn over one eye that assists with targeting. +1 to hit with a basic, special or heavy weapon provided the user does not move.
Telescopic sight - 60 thrones
A simple but effective gunsight, if the user does not move then they can re-roll a failed roll to hit with Basic or special weapons only. The bonus does not apply on overwatch.
Infra Red sight - 50 thrones
Similar to a mono-sight, it allows the user to see where enemies are hiding, rendering cover useless. Partial cover is ignored entirely, and the -2 to hit from full cover becomes only -1.
Generic explosives (cost is per single explosive) and special ammo (good for one battle) that can be taken:
Note - explosives ignore cover. Be careful about bunching up and take out grenade enemies quickly! If a character or NPC with a grenade is hit by a shot, an extra D6 is rolled after damage. If the result is a 6, one of their grenades explodes on them immediately.
Frag Grenade - 20 thrones
Hit bonus: D3 hits per grenade per target.
Strength: 4
Damage: 1
Save mod.: -1
Blast (can hit multiple enemies)
Fire bomb - 15 thrones
Strength: 3
Damage: D6
Save Mod.: -2
Requires a successful initiative test to put out when someone is set on fire by one otherwise they continue to be hit by it until they go down or out of action.
Krak Grenade - 30 thrones
Strength: 6
Damage: 6
Save mod.: -4
Heavy: this lofty grenade is difficult to throw, and confers a -1 to hit penalty.
Demolition: the krak grenade can be affixed to any unmoving object next to the user instead of shooting in that round. This makes it a relatively cheap form of high yield explosive, second only to Meltabombs in potency.
Frag Missile - 25 thrones
Hit bonus: D6 hits per attack
Strength: 4
Damage: 1
Save mod.: -1
Large blast
Krak Missile - 40 thrones
Strength: 8
Damage: D6
Save mod.: -6
High Impact
Detpack - 60 thrones
Strength: 10
Damage: 1D6+6
Save mod.: -3
High Impact
Large blast radius
Special: These large, cumbersome mining explosives can only ever be placed and set with a timed detonator or a primitive remote explosive. Also, carrying these in a firefight is akin to becoming a walking bomb. Best used for - surprise, surprise - demolitions, they are as expensive as they are dangerous. Guaranteed damage to whatever they are attached to. Handle with caution. Takes 2 rounds in combat to set up.
Stub gun dum-dum bullets - 5 thrones (one battle)
Shotgun shells: (any shotgun provides access to both of these, if you fail an ammo roll for one shotgun shell type you may still use the other until you run out of all types in that battle)
Solid Slug:
Range: Short
To Hit Modifiers: +1 short -2 long
Strength: 4
Damage: 1
Save Modifier: -
Ammo Roll: 4+
Scatter Shot:
Range: Short
To Hit Modifiers: +2 short -4 long
Strength: 3
Damage: D3
Save Modifier:
Ammo Roll: 4+
Special shells: (good for one battle)
Solid Slug: - 5
Range: Short
To Hit Modifiers: +1 short -2 long
Strength: 4
Damage: 1
Save Modifier: -
Ammo Roll: 4+
Man-Stopper shotgun shells - 10
Range: Short
To Hit Modifiers: - short - long
Strength: 4
Damage: 2
Save Modifier: -2
Ammo Roll: 4+
Hot-Shot power pack - 10 (one battle)
This can only be used with Laspistols and Lasguns. It increases their strength by 1 but also decreases their ammo roll to 6+.
Armour - You can only have one type of armour per character:
Metal armour - 6+ save (5 thrones)
Mesh armour - 5+ save (25 thrones)
Flak armour - 4+ save (50 thrones)
Carapace armour: 3+ save (100 thrones)
Knife - 5
Range: Close combat
Strength: As user
Damage: 1
Save Mod: -
Special: can be thrown at short range as a ranged attack with the strength of the user.
Sword - 20
Range: Close combat
Strength: As user
Damage: 1
Save Mod: -
Special:
Parry - can force opponent to re-roll their highest attack dice. Two parrying weapons cancel out.
Club/maul/bludgeon/Axe - 20
Range: Close combat
Strength: As user +1
Damage: 1
Save Mod: -
Special:
Chain or Flail - 10
Range: Close combat
Strength: As user +1
Damage: 1
Save Mod: -
Special:
It is impossible to parry against a fighter armed with this weapon.
Fumble - because the weapon is so clumsy, every fumble made by the wielder confers +2 to the opponent's combat score rather than just +1.
Massive Axe, Sword or Club - 25
Range: Close combat
Strength: As user +3
Damage: 1
Save Mod: -
Special: -1 to WS, two-handed
Spear - 15
Range: Short / Close combat
Strength: As user
Damage: 1
Save Mod: -
Special:
Can be thrown up to short range. If it hits then it can no longer be used in melee until collected after the battle.
Shield - 15
Range: Close combat
Strength: As user
Damage: 1
Save Mod: -
Special:
Defensive - This weapon adds +1 to the user's armour save in close combat, or confers a 6+ save if they do not already have one. It is most effective when paired with another melee weapon. Due to its defensive nature, it does not add +1 attack when used with another weapon.
Wrist-blade - 15 (The same as a sword, except you can keep the hand free to use another weapon. If you go up against another enemy who has a weapon that can parry, it does not cancel out as normal, they get to parry and you do not as the wrist-blade is more awkward to use than a regular sword)
Range: Close combat
Strength: As user
Damage: 1
Save Mod: -
Special:
Poisoned knife - 35
Range: Close combat
Strength: user
Damage: 1
Save Mod: -
Special:
Toxic - this weapon always wounds on a 4+ regardless of toughness values.
Electro-whip - 45
Range: Close combat
Strength: user
Damage: 1
Save Mod: -
Special:
Shock field - any enemy who loses their last wound to this weapon automatically goes out of action. They can be automatically captured at the end of the battle if you choose, provided you won the fight. They will still suffer an injury roll as normal but re-roll any result of 'Death.' Once captured you can still just kill them if you captured them.
Cannot be parried
Chainsword - 50
Range: Close combat
Strength: user +1
Damage: 1
Save Mod: -1
Special:
Parry
Chain Axe - 60
Range: Close combat
Strength: +2
Damage: 1
Save Mod: -1
Special:
Shock Maul - 75
Range: Close combat
Strength: +3
Damage: 1
Save Mod: -
Special:
Shock field - any enemy who loses their last wound to this weapon automatically goes out of action. They can be automatically captured at the end of the battle if you choose, provided you won the fight. They will still suffer an injury roll as normal but re-roll any result of 'Death.' Once captured you can still just kill them if you captured them.
Riot Shield - 80
Range: Close combat
Strength: +1
Damage: 1
Save Mod: -
Special:
Confers +1 to all armour saves against ranged and melee attacks.
Eviscerator - 100
Range: Close combat
Strength: user x2
Damage: 1
Save Mod: -2
Special:
Parry
Two-handed
-1 WS
Pistols:
Note - Pistols can be used in melee. In this case they do not use BS, they attack in the same way as any other close combat weapon and do not get modifiers to hit based on range. They resolve damage normally. If you fumble with a close combat pistol attack, you make an ammo roll. A good Gunslinger doesn't neglect their WS!
Range - apart from flame weapons, any weapon can be used at short or long range. The range is simply a description of the weapon's effective range. Many pistols or rapid-fire weapons are much easier to hit at close range while rifles or snipers are generally more effective at long range. The trade off is pistols can be used in melee and heavy weapons make you more vulnerable to melee, with basic weapons sitting somewhere inbetween. Pistols also leave your off-hand free to use another weapon. Heavy weapons cannot be fired on a turn you move.
Stub pistol - 10
Range: Short
To Hit Modifiers: - short -1 long
Strength: 3
Damage: 1
Save Modifier: -
Ammo Roll: 3+
Special - Dum Dum Bullets. A stub gun can be loaded with dum-dum bullets. A supply of these hand-made bullets costs extra, but they are more powerful than standard ammunition. It adds +1S to the weapon but if an ammo roll is failed, the weapon automatically explodes.
Sawed-off Shotgun - 20 [comes with scatter shells, see shotgun shell types]
Range: Very Short
To Hit Modifiers: varies short -5 long (regardless of shell type)
Strength: varies
Damage: varies
Save Modifier: varies
Ammo Roll: varies
Special: May be used by fighters on Bikes. Sawed-off shotguns always suffer -5 to hit at long range regardless of shell type.
Stub Revolver - 25
Range: Short
To Hit Modifiers: - short -1 long
Strength: 4
Damage: 1
Save Modifier: -
Ammo Roll: 3+
Autopistol - 25
Range: Short
To Hit Modifiers: +1 short -2 long
Strength: 3
Damage: 1
Save Modifier: -
Ammo Roll: 4+
Hand Cannon - 30
Range: Short
To Hit Modifiers: - short -2 long
Strength: 5
Damage: 1
Save Modifier: -
Ammo Roll: 4+
Special: 2-handed
Laspistol - 35
Range: Short
To Hit Modifiers: +1 short -2 long
Strength: 3
Damage: 1
Save Modifier: -
Ammo Roll: 2+
Hand Flamer - 40
Range: Short/fire cone
To Hit Modifiers: D6 autohits on each target in range each time you shoot
Strength: 3
Damage: 1
Save Modifier: -1
Ammo Roll: Special
Special: the hand-flamer is a one-shot weapon. It can only be fired once per engagement. It cannot be used in melee like a normal pistol. Enemy takes an initiative test or they catch fire (a 6 always fails) and take an extra hit in addition to normal damage, and each turn they must keep taking initiative tests to put themselves out or keep taking damage.
Hellpistol - 60
Range: Short
To Hit Modifiers: - short -1 long
Strength: 3
Damage: 1
Save Modifier: -3
Ammo Roll: 4+
Bolt Pistol - 75
Range: Short
To Hit Modifiers: - short -1 long
Strength: 5
Damage: 2
Save Modifier: -1
Ammo Roll: 6+
Plasma Pistol - 90
Range: Short
To Hit Modifiers: - short -2 long
Strength: 7
Damage: 1
Save Modifier: -3
Ammo Roll: 4+
Special: a failed ammo roll on high power mode means the weapon overheats and the user takes 1 hit from the weapon. Can be overcharged to strength 8 and damage 2.
Basic weapons:
Rapid-fire - all basic weapons can make 2 attacks per turn instead of 1 at -1 to hit.
Stub carbine - 20
Range: Medium
To Hit Modifiers: - short - long
Strength: 3
Damage: 1
Save Modifier: -
Ammo Roll: 3+
Special - Dum Dum Bullets. A stub gun can be loaded with dum-dum bullets. A supply of these hand-made bullets costs extra, but they are more powerful than standard ammunition. It adds +1S to the weapon but if an ammo roll is failed, the weapon automatically explodes.
Shotgun (scatter shells default) - 25
Range: Short
To Hit Modifiers: varies
Strength: varies
Damage:
Save Modifier: varies
Ammo Roll: varies
Special: knock-back. The high impact of a shotgun is quite capable of knocking a person off balance or even off their feet. If a person is shot off the side of a high ledge their roll for falling is done at -1 initiative.
Scatter Shot shells:
Range: Short
To Hit Modifiers: +2 short -4 long
Strength: 3
Damage: 1
Save Modifier: -
Ammo Roll: 4+
Special: for every hit roll D3 rolls to wound.
Autogun - 50
Range: Medium
To Hit Modifiers: +1 short - long
Strength: 3
Damage: 1
Save Modifier: -
Ammo Roll: 4+
Lasgun - 65
Range: Medium
To Hit Modifiers: +1 short +1 long
Strength: 3
Damage: 1
Save Modifier: -
Ammo Roll: 2+
Hellgun - 85
Range: Medium
To Hit Modifiers: +1 short +1 long
Strength: 3
Damage: 1
Save Modifier: -3
Ammo Roll: 4+
Boltgun - 100
Range: Medium
To Hit Modifiers: - short - long
Strength: 5
Damage: 2
Save Modifier: -1
Ammo Roll: 6+
Special weapons:
Note - you can only use special weapons if you have taken the SPECIALIST skill. Ordinary gangers cannot use these weapons effectively. Without any kind of real training, affinity with unique or complex weapons is a rare talent.
Bolt-action sniper rifle - 70
Range: Long
To Hit Modifiers: - short - long
Strength: 3
Damage: 1
Save Modifier: -
Ammo Roll: 4+
Special:
Headshot - a roll to hit of 6 automatically wounds the target with a -2 save modifier.
Telescopic sight - re-roll a failed roll to hit
Long-Las - 105
Range: Long
To Hit Modifiers: - short - long
Strength: 4
Damage: 1
Save Modifier: -
Ammo Roll: 2+
Special:
Headshot - a roll to hit of 6 automatically wounds the target with a -2 save modifier.
Telescopic sight - re-roll a failed roll to hit
Stalker-pattern Boltgun - 160
Range: Medium
To Hit Modifiers: - short - long
Strength: 5
Damage: 2
Save Modifier: -1
Ammo Roll: 6+
Special:
Headshot - a roll to hit of 6 automatically wounds the target.
Telescopic sight - re-roll a failed roll to hit
Grenade Launcher - 30
Range: Long
To Hit Modifiers: - short - long
Strength: varies
Damage: varies
Save Modifier: varies
Ammo Roll: auto
Special: This weapon only uses grenades. You must buy a supply to last each battle. Special/rare grenades do not count as a supply and can only be used individually even in a grenade launcher.
Move or fire - because of its bulk and massive recoil, a fighter cannot shoot a grenade launcher if he moves.
Flamer - 40
Range: Short
To Hit Modifiers: D6 autohits per target every time you shoot (can hit multiple close targets for D6 hits each)
Strength: 4
Damage: 1
Save Modifier: -1
Ammo Roll: 4+
Special: An ammo test is required every time the flamer is fired regardless of the to-hit roll. There is a chance to set your target on fire if they are hit.
Plasma Gun - 140
Range: Short / Medium
To Hit Modifiers: - short - long
Strength: 7
Damage: 2
Save Modifier: -3
Ammo Roll: 4+
Special: A failed ammo roll on high power mode means the weapon overheats and the user takes 1 hit from the weapon. Can be overcharged, increasing strength to 8 and damage to 3.
Rapid Fire
High Impact
Meltagun - 200
Range: Short
To Hit Modifiers: +1 short -3 long
Strength: 8
Damage: D6+6
Save Modifier: -5
Ammo Roll: 4+
Special:
Heavy Weapons:
A note on heavy weapons and sustained fire: weapons with sustained fire dice can either be fired single shot, or roll a number of attacks per sustained fire value. These can then be resolved against the same target or multiple close targets. Every shot can generate an ammo roll on a 6 increasing the likelihood of running out of ammo/gun jamming early in the engagement but can decimate huge numbers of enemies. Also, you cannot move and shoot heavy weapons without certain SKILLS. They must be set up and braced (i.e. cannot be fired in a battle turn that your character moved - overwatch is very useful!)
Missile Launcher - 80
Range: Very Long
To Hit Modifiers: - short - long
Strength: as missile
Damage: as missile
Save Modifier: as missile
Ammo Roll: auto
Special: Missile Launchers must have a supply of missiles bought before each engagement and can only use one at a time, either krak (heavy duty anti-armour) or frag missiles (large blast anti-infantry). See the special ammo/grenades/missile section for cost/stats.
Heavy Stubber - 120
Range: Long
To Hit Modifiers: - short - long
Strength: 4
Damage: 1
Save Modifier: -
Ammo Roll: 4+
Special:
Sustained Fire: 3
Heavy Flamer - 150
Range: Short
To Hit Modifiers: D6+2 rolls to hit every time you shoot (can hit multiple close targets for D6 each)
Strength: 5
Damage: 1
Save Modifier: -2
Ammo Roll: 4+
Special: An ammo test is required every time the flamer is fired regardless of the to-hit roll. Can set target on fire. CAN be fired in the same turn that you move as it has no recoil.
Rotary Cannon - 250
Range: Long
To Hit Modifiers: - short - long
Strength: 4
Damage: 2
Save Modifier: -1
Ammo Roll: 4+
Special:
Sustained Fire: 4
Heavy Bolter - 275
Range: Long
To Hit Modifiers: - short - long
Strength: 5
Damage: 3
Save Modifier: -2
Ammo Roll: 6+
Special:
Sustained fire: 3
Heavy Plasma Gun - 285
Range: Long / Very Long
To Hit Modifiers: - short - long
Strength: 7
Damage: 4
Save Modifier: -5
Ammo Roll: 4+
Special: A failed ammo roll on high power mode means the weapon overheats and the user takes 1 hit from the weapon. Can be overcharged, increasing strength to 8 and damage to 6.
Blast: HPGs are essentially ordnance and they impact with a small blast radius. While not as large as a frag missile's detonation, it is far more deadly.
High Impact
Autocannon - 300
Range: Very Long
To Hit Modifiers: - short - long
Strength: 7
Damage: 2
Save Modifier: -3
Ammo Roll: 4+
Special: High Impact
Sustained Fire: 2
Man-portable Lascannon - 400
Range: Very Long
To Hit Modifiers: - short - long
Strength: 9
Damage: 6
Save Modifier: -8
Ammo Roll: 2+
Special: High Impact
********High Impact
Weapons with a strength of 7 or more are high impact. People hit by them go out of action on a roll of a 4, 5 or 6 rather than just a 5 or 6.
Misc:
Clip Harness - 20
A safety line that can be attached to an appropriate nook, it allows the ganger to rappel down a building or fall off somewhere yet remain safe. The line can of course be cut by another person if they are close enough.
Photo-Visor - 20
A special visor that enhances vision in poor light conditions. They allow a wearer to re-roll failed initiative tests to avoid the effects of a photon flash flare and similar devices. A fighter wearing a photovisor can also see through smoke and shoot through it with a -1 penalty.
Respirator - 20
A person wearing a respirator can re-roll a failed toughness test to resist dangerous gases.
Com-bead set (enough for 10 people, locked to the same channel) - 50 thrones
One set has enough for 10 people and they are locked to the same channel. They can only be used within the same settlement due to their limited range.
Vox Caster - 30 thrones
This heavy radio set can only communicate with other vox casters or allow a set of vox beads to transmit throughout the entire underhive.
Silencer - 20 thrones
Can be fitted to a stub pistol, autopistol, stub gun, autogun or bolt-action sniper rifle. The weapon becomes almost completely silent.
Extra ammo - 10% weapon cost
The ganger carries extra ammo. This lets them re-roll a failed ammo test, at which point the extra ammo is used up. You can carry up to 3 extra ammo per character. Unused extra ammo is kept at the end of the battle.
Grapnel - 30 thrones
A magnetic grapnel attached to a long wire which is fired from a small launcher. You shoot it, it sticks to something and then it reels you in. It can also be used as a weapon if you are desperate.
Range: Short
To hit modifier: Short +2 Long +1
Strength: 2
Damage: 1
Save mod.: -
Ammo Roll: 6+
Medi-pack - 50 thrones
A medi-pack can only be used by a ganger with the Medic skill. A medic can use the medi-pack on a friend who is downed in a fight. They must spend some time working on them, and if uninterrupted then on a 1-4 the patient recovers to a flesh wound, on a 5 they go down and on a 6 they go out of action.
Screamers - 25 (one encounter)
These small devices are triggered when stepped on and they then sound an alarm. If an enemy gang is sneaking up on your base, then every time one of them moves there is a 4+ chance they will step on a screamer. The alarm will sound and the entire gang will be alerted to the intruders' presence.
Stummers - 25 (one encounter)
These devices are the opposite of screamers. When attacking an enemy base, intruders can spread these devices around. They absorb sound, cancelling out the effects of screamers if they are present.
Camo-cloak - 50
Your character does not benefit from cover normally. Instead, they are always at -2 to hit in cover. As normal this does not apply to blast weapons or flame weapons ignore hit modifiers. Also, enemies only detect them on an initiative roll of 1.
Gunsights
Red-dot laser sight - 50 thrones
A device fitted to the end of a weapon that traces a red light to where the shots will hit. Adds +1 to hit, can only be used on a pistol, basic or special weapon. Anyone shot at by one of these weapons gets a chance to 'spot the dot' and on a D6 roll of 6 they avoid the shot entirely.
Mono Sight - 30 thrones
A small optical device worn over one eye that assists with targeting. +1 to hit with a basic, special or heavy weapon provided the user does not move.
Telescopic sight - 60 thrones
A simple but effective gunsight, if the user does not move then they can re-roll a failed roll to hit with Basic or special weapons only. The bonus does not apply on overwatch.
Infra Red sight - 50 thrones
Similar to a mono-sight, it allows the user to see where enemies are hiding, rendering cover useless. Partial cover is ignored entirely, and the -2 to hit from full cover becomes only -1.
Generic explosives (cost is per single explosive) and special ammo (good for one battle) that can be taken:
Note - explosives ignore cover. Be careful about bunching up and take out grenade enemies quickly! If a character or NPC with a grenade is hit by a shot, an extra D6 is rolled after damage. If the result is a 6, one of their grenades explodes on them immediately.
Frag Grenade - 20 thrones
Hit bonus: D3 hits per grenade per target.
Strength: 4
Damage: 1
Save mod.: -1
Blast (can hit multiple enemies)
Fire bomb - 15 thrones
Strength: 3
Damage: D6
Save Mod.: -2
Requires a successful initiative test to put out when someone is set on fire by one otherwise they continue to be hit by it until they go down or out of action.
Krak Grenade - 30 thrones
Strength: 6
Damage: 6
Save mod.: -4
Heavy: this lofty grenade is difficult to throw, and confers a -1 to hit penalty.
Demolition: the krak grenade can be affixed to any unmoving object next to the user instead of shooting in that round. This makes it a relatively cheap form of high yield explosive, second only to Meltabombs in potency.
Frag Missile - 25 thrones
Hit bonus: D6 hits per attack
Strength: 4
Damage: 1
Save mod.: -1
Large blast
Krak Missile - 40 thrones
Strength: 8
Damage: D6
Save mod.: -6
High Impact
Detpack - 60 thrones
Strength: 10
Damage: 1D6+6
Save mod.: -3
High Impact
Large blast radius
Special: These large, cumbersome mining explosives can only ever be placed and set with a timed detonator or a primitive remote explosive. Also, carrying these in a firefight is akin to becoming a walking bomb. Best used for - surprise, surprise - demolitions, they are as expensive as they are dangerous. Guaranteed damage to whatever they are attached to. Handle with caution. Takes 2 rounds in combat to set up.
Stub gun dum-dum bullets - 5 thrones (one battle)
Shotgun shells: (any shotgun provides access to both of these, if you fail an ammo roll for one shotgun shell type you may still use the other until you run out of all types in that battle)
Solid Slug:
Range: Short
To Hit Modifiers: +1 short -2 long
Strength: 4
Damage: 1
Save Modifier: -
Ammo Roll: 4+
Scatter Shot:
Range: Short
To Hit Modifiers: +2 short -4 long
Strength: 3
Damage: D3
Save Modifier:
Ammo Roll: 4+
Special shells: (good for one battle)
Solid Slug: - 5
Range: Short
To Hit Modifiers: +1 short -2 long
Strength: 4
Damage: 1
Save Modifier: -
Ammo Roll: 4+
Man-Stopper shotgun shells - 10
Range: Short
To Hit Modifiers: - short - long
Strength: 4
Damage: 2
Save Modifier: -2
Ammo Roll: 4+
Hot-Shot power pack - 10 (one battle)
This can only be used with Laspistols and Lasguns. It increases their strength by 1 but also decreases their ammo roll to 6+.
Armour - You can only have one type of armour per character:
Metal armour - 6+ save (5 thrones)
Mesh armour - 5+ save (25 thrones)
Flak armour - 4+ save (50 thrones)
Carapace armour: 3+ save (100 thrones)
Power armour: 3+ save on 2d6, adds +1 strength (2000 thrones)
Ceramite war-plate: 2+ (300 thrones)
Rare items - by checking the Trader Outpost when it's open for business and having a more thorough look around, you may be able to find some very rare items are for sale. Every time you look for rare tech, it is randomly generated and you will have the chance to buy what is offered.
Rare trade table:
11-16 Power weapon - roll a D6
1 - Power Axe - 160 thrones
Range: Close combat
Strength: +2
Damage: 2
Save Mod: -3
Special:
2 - Power Fist - 200 thrones
Range: Close combat
Strength: x2
Damage: 3
Save Mod: -5
Special: High Impact, -1WS
3 - Power Maul - 170 thrones
Range: Close combat
Strength: +3
Damage: 2
Save Mod: -2
Special: an enemy who goes down to a blow from a power maul will automatically go out of action.
4 - Power Sword - 145 thrones
Range: Close combat
Strength: +1
Damage: 2
Save Mod: -4
Special: Parry. If you parry against a non-power weapon, on a D6 roll of 3+ that weapon is destroyed.
5 - Lightning Claw - 170 thrones
Range: Close combat
Strength: as user
Damage: 2
Save Mod: -3
Special: Re-roll failed rolls to wound.
6 - Power Blade 75
Range: Close combat
Strength: as user
Damage: 1
Save Mod: -3
Special: Wrist-mounted and leaves hand free for another weapon.
21-26 Rare Weapon - Roll a D6
1-3 Needle Weapon - Roll a D6.
-- 1-4 needle pistol - 150
Range: Short
To Hit Modifiers: - short - long
Strength: 2
Damage: 2
Save Modifier: -3
Ammo Roll: 6+
-- 5-6 needle rifle - 260
Range: Long
To Hit Modifiers: - short - long
Strength: 2
Damage: 2
Save Modifier: -3
Ammo Roll: 2+
Special (both):
Toxic dart: always wounds non-vehicles on a 2+.
Injuries: Enemies hit by needle weapons do not use the normal injury chart. Instead, consult the following:
1: The poison wears off, but the fighter is left drowsy. Counts as a flesh wound.
2-3: Paralysis. The target drops to the floor stiff and cannot move or act for the rest of the battle. They are down and cannot test to recover.
4-6: Comatose. The target goes limp, frothing at the mouth as poison works to systematically shut down their body. They immediately go out of action.
4 Web Pistol - 140
Range: Very short
To Hit Modifiers: - short -1 long
Strength: Special
Damage: 1
Save Modifier: -
Ammo Roll: 6+
Webbing: if the shot hits then there is no roll to wound. The target is ensnared and they may do nothing except try to break free. This requires getting a score of 9 or more by rolling a D6 and adding the character's strength characteristic to it. If they fail then they can do nothing and they automatically suffer 1 wound, although armour saves are permitted against this.
Capture: If the owner's side wins the fight, then any enemy that has been webbed/ensnared as above that fails to escape by the end of the battle is automatically captured.
5 Combat Shotgun - 170
Range: Short
To Hit Modifiers: <as shotgun shell>
Strength: <as shotgun shell>
Damage: <as shotgun shell>
Save Modifier: <as shotgun shell>
Ammo Roll: <as shotgun shell>
Special: the combat shotgun is notorious for its high rate of fire and as such makes 2 attacks by standard and 4 when rapid-fired.
6 Assault Gun - 190
Range: Medium
To Hit Modifiers: +1 short - long
Strength: 4
Damage: 1
Save Modifier: -1
Ammo Roll: 3+
Special: Similar to an autogun or boltgun in appearance, it is surprisingly high-tech and can produce an incredible rate of fire for a rifle. It always makes 3 attacks, or 6 if rapid-fired.
31 Melta Bomb
Range: Must be placed
To Hit Modifiers: ----
Strength: 8
Damage: D6
Save Modifier: -4
Ammo Roll: -
Special: Cannot be thrown like any other grenade. It must be placed carefully. It 'hits' automatically and will detonate one round after being placed. It has no real blast radius and can only be employed against vehicles or buildings or other stationary objects.
32 Plasma Grenade - 30+2D6
Range: Varies on user's strength
To Hit Modifiers: -
Strength: 6
Damage: 1
Save Modifier: -2
Ammo Roll: -
33 Executioner Shells - 20+2D6
These are shells that can be used for a single battle by a bolt pistol or boltgun. They add +1 to hit at long range and increase the weapon's armour penetration by 1.
34 Incendiary Shells - 30+3D6
These are shells that can be used for a single battle by a bolt pistol or boltgun. They change the weapon's damage to D6.
35-36 Monoweapon. Roll a D6 - Weapon cost x2
A monoweapon increases the weapon's armour penetration value by 2 points.
1-2 Sword
3 Great Weapon
4 Glaive
5 Knife. Roll a D6. 1-3 Knife, 4-6 Double-bladed knife.
6 Chain-weapon. Roll a D6. 1-2 Chain blade, 3-4 Chainsword, 5-6 Chain Axe.
41-42 Cheap Bionics
- Any 1 bionic for half price
43 Auto Repairer - 80+4D10
Any ganger who fails an ammo test can re-roll it with a 50% chance to pass anyway. The auto-repairer is bulky and always remain at the base. It requires a heavy to be in the gang to use it.
44 Bio-booster - 50+4D10
This only works once per game. The first injury in a battle the ganger suffers, then he counts 1-4 as a flesh wound instead of just 1.
45 Bio-scanner - 50+3D10
A small device the size of a pistol, it detects life signs in the vicinity. It allows the user to find enemies who are hiding, see ambushes lying in wait and detect intruders.
46 Blindsnake pouch - 30+2D10
The ratskins milk venom from the albino blindsnake, mix the toxin with a certain secret fungi and place the resultant paste into a small leather pouch which is worn around the neck. The spirit of the blindsnake is said to watch out for bad spirits and to guide its owner in the darkness. The mixture in the leather pouch is absorbed by the fighter's skin and enhances his natural psychic sensitivity, endowing him with a sort of rudimentary sixth sense.
If shot by an enemy on overwatch, 4+ chance to evade the attack. Also might sense imminent danger.
51 Grav-chute - 40+4D10
A heavy backpack with thrusters. While worn, the wearer cannot take fall damage from any height.
52 Isotropic Fuel Rod - 50+4D10
Highly prized, this can be expended in exchange for receiving a new Settlement territory.
53 - Master-crafted close-combat weapon - weapon cost x2. Roll a D6
1-3 - Common one-handed weapon
4-5 - Common two-handed weapon
6 - Power weapon
The weapon is the immaculate, hand-crafted work of an artificer. The weapon adds +1 to the weapon's strength, damage and AP. You can choose any weapon from the category you were offered, just remember to take into account how expensive it will be.
54 - Storm Bolter - 200 thrones
Range: Medium
To Hit Modifiers: - short - long
Strength: 5
Damage: 2
Save Modifier: -2
Ammo Roll: 6+
Special: Always makes 4 attacks. Requires strength four or higher to use.
55 - Thunder Hammer - 125+4d10 thrones
Range: Close combat
Strength: x2 user strength
Damage: D3+3
Save Mod: -5
Special: High Impact. Two-handed.
56 - Combi-weapon. Roll a D6:
1 - Combi-flamer
2 - Combi-melta
3 - Combi-Plasma
4 - Combi-grenade launcher
5 - Combi-bolter (twin-linked bolter)
6 - Combi-Needle pistol
A combi weapon is treated like a normal boltgun. However, once per battle the owner can fire the secondary weapon (they get one shot only with it per battle).
The only one that is different to this is the combi-bolter which is treated like a twin-linked weapon - every hit scored counts as two hits. It is the only twin-linked weapon that can be carried independently of a vehicle mount.
61 - One in a Million weapon - weapon cost x2
Roll a D6 to see what type of weapon you get offered:
1-2 - Pistol
3 - Basic
4 - Special
5 - Heavy
6 - Rare
The weapon is the immaculate, hand-crafted work of an artificer. It will always pass ammo rolls and will never explode, or if it would normally automatically fail an ammo roll then it can now pass on a 4+. You can choose any weapon from the category you were offered, just remember to take into account how expensive it will be.
62 - Ratskin Map - D10x10 thrones. Roll a D10:
1 – the map leads to a Scrap Worm nest
2-4 – the map is a fake and leads to a dead end or barren area in the wastes.
5-6 – Vague and inaccurate, the map is a poorly-drawn copy of the real thing, but with enough time, effort and people scouring the underhive trying to figure it out, they may just find something of value. It's useful but provides no bonus to searching.
7-8 – Worn and incomplete. This confusing mess is essentially accurate, if hard to decipher. It follows the same rules as above, except they get +10 instead of just +5 for every ganger out searching.
9 – Ancient and faded. Barely legible, this map is nonetheless a genuine ancient relic. Follows the same rules as above except +15 to find the cache.
10 – Recent and accurate. The map was made not long ago and is complete. Same rules as above except +20 to find the cache.
63 Mung Vase. D10x10 thrones. Roll a D10:
1-4 – The vase is an obvious and worthless fake. Whoever you attempt to sell it to throws you and your vase out onto the street. The vase is broken and you have wasted your cash.
5-7 – It's a fake but quite a nice one and the trade gives you D10 thrones for it.
8-9 – Of fine craftsmanship but not an original artifact, you still sell it for a decent price of 30x1d10 thrones.
10 – It's the genuine article, worth thousands of thrones. Of course, no one in their right mind would ever let a ganger walk away with this. Hivers would die by the score to get their hands on this! And even if they escape, once the word gets out that someone possesses one, there's sure to be war. If the gang can successfully find a rich enough buyer in the upper hive then they stand a good chance of being able to escape the underhive for good. However, getting there will likely prove nigh impossible and with all the other gangs out for their blood they're sure to be in trouble.
64 Inferno Pistol. 300+4d100 thrones
An exceptionally rare weapon, it is similar to a meltagun but far smaller.
Range: Very Short
To Hit Modifiers: +1 short -1 long
Strength: 8
Damage: D6+6
Save Modifier: -6
Ammo Roll: 4+
Special: An Inferno pistol is always a one-in-a-million weapon, meaning it always passes its ammo rolls. As a melta weapon it also rolls 2D6 to penetrate vehicle armour.
65 Refractor Field - 100+4D10 thrones.
A military-grade force field generator, it casts the owner in a golden glow. They have an unmodifiable 5+ invulnerable save against all ranged attacks that can be taken in addition to any other saves. However, all enemies have +1 to spot and hit them.
66 Nomad Rifle - 250+4D10
Range: Very Long
To Hit Modifiers: - short - long
Strength: 7
Damage: 3
Save Modifier: -4
Ammo Roll: 4+
Special: High Impact. Special weapon. Requires 4 strength or higher to use. The Nomad Rifle is a sniper rifle that cannot be fired if the user moves - it is so large and its recoil is so great that they must first brace themselves. It is a rare and prestigious weapon. Unlike the advanced needle rifle, it simply uses sheer brute force to kill rather than ingenious technology and poison. Each one is a masterfully hand-crafted weapon and they are surprisingly reliable, making them highly sought after. It is rumoured that there are only three in the entire Hive, two of which reside in the display rooms of nobles.
Valorum's workshop [bionics]
Enginseer Valorum's Cybernetic Workshop and self-propelled locomotive Enterprises inc.
The first and last place to go if you have a large enough pocket to afford the prestige of owning a functional vehicle. He also sells servitors and cyber mastiffs.
Enginseer Valorum - as a member of the Machine Cult, Valorum is a mysterious and inhuman figure, almost god-like to the typical underhiver and rightly feared. Of course, Mechanicus induction apparently hasn't dulled his innate business sense, although why he chooses to do his work in the Underhive rather than in some well-equipped hive spire machine bay is unknown. None dare to ask, and conduct their business as quickly as possible.
WS: 4
BS: 4
S: 4
T: 5
W: 4
I: 3
A: 2
LD: 9
Sv: 3+
Mechanicus Power Axe
Plasma torch mechadendrite (Plasma pistol, low power only)
Omni-tool mechadendrite
Carapace and sub-dermal armour
Bionic arms and legs
One bionic eye
Hooded Mechanicus robes
Skills: Iron Jaw, Armourer, Inventor, Medic, Specialist, Weaponsmith, Adeptus Mechanicus Implants (that's magic metal gubbinz to you uneducated ganger peasants)
You can contact the Enginseer about purchasing bionic replacements:
(a note on bionics, Valorum is the only reliable source of these, but they are expensive. Occasionally you may be able to find other dealers able to sell and install similar bionics for a cheaper price)
The bionics of the underhive are typically crude and dysfunctional, however Valorum's constructions are an unheard-of level of quality for the streets of the Underhive.
Bionic Eye - 75 Thrones
Photosensitive: The fighter may re-roll a failed save against blinding by a Photon Flash flare (D6 versus Initiative). He may also see past and shoot through smoke with a -1 to hit penalty. The ganger can also see in the dark without penalty.
Bionic Leg - 50 Thrones
Kick: The fighter gains +1 to his attacks characteristic in Hand-to-Hand combat.
Bionic Hand - 25 Thrones
Can be used if a ganger has suffered hand injuries or total loss but still has the rest of their arm. They can however be used in conjuction with bionic arms - while the arm does contain a replacement hand, these specific ones are superior and provide bonuses. These include being able to keep hold of ledges much more easily due to a far stronger grip and individual bionic fingers can be replaced for 10 thrones if they are lost.
Bionic Arm - 50 Thrones
The fighter receives +1 strength.
Servo-claw - 90
Range: Close combat
Strength: x2
Damage: 2
Save Mod: -
Special: -1 to WS
Lobo-chip - 30 thrones
The lobotomy chip is similar in appearance to a skull chip, however its function is different. It anaesthetises part of the brain, reducing the wearer's sensitivity and curbing excessive and violent behaviour. It will cure a fighter of the manic behaviour associated with lasting head injuries so that they no longer have to test for stupidity or frenzy. However, their initiative characteristic is reduced to 1 due to their dulled senses. Once implanted, it cannot be removed and transferred to another fighter.
Skull Chip - 30 thrones
This is a small bio-chip that looks like a stud or tiny metal plate covered in circuitry. It is attached to the skull by means of a fine needle-like pin which fixes straight into the brain. The chip melds with the wearer's mind and improves his reaction time and memory functions. It allows the user to re-roll any failed initiative tests.
Concealed Blade - 10 thrones
Although it is possible to hide any small blade on your person, the concealed blade is something a little different. This tiny blade is cunningly concealed insside a small bio-compartment under the owner's skin. It is no use in a fight but can allow a ganger a chance to escape captivity. The concealed blade is lost after one use.
A captured fighter with a concealed blade can try to escape. Roll a D6:
1 - the fighter is killed while trying to escape.
2 - The fighter is recaptured immediately.
3 - The fighter escapes but loses all his weapons and equipment to the capturing gang.
4-6 - The fighter escapes with all of his equipment and weaponry.
Misc Bionic Implant - 75+6D6 Thrones
There are almost endless types of injury that can be suffered in vicious gang wars. This 'catch-all' price covers any other injuries that can be conceivably replaced or repaired with bionics. However, each one must be meticulously custom-made for every individual, meaning they are very expensive due to their invariably unique details. E.g. bionic bone reconstruction and cloned synth-flesh grafting to repair horrific scarring.
Cyber Mastiff - 200 Thrones
WS: 4
BS: 0
S: 4
T: 3
W: 1
I: 6
A: 2
LD: 10
Sv: 3+
Special: the bionic claws of the Mastiff reduce armour saves by 1. The Cyber Mastiff has an upkeep of 20 thrones per week.
Vehicles:
When a vehicle is reduced to 0 wounds it is wrecked and a D6 is rolled. On a 6 it explodes and all passengers suffer D3 S5 hits.
The strength characteristic is used if you ram an enemy with the vehicle. They take D6 hits equal to the strength of the vehicle. If two vehicles ram they both take a hit from each other, unless one vehicle was not moving.
Characters can shoot out of a vehicle normally if it does not move. If it moves, then they suffer -1 to hit.
Bike - 40 Thrones
WS: N/A
BS: N/A
S: 2
T: 3
W: 1
I: N/A
A: N/A
LD: N/A
Sv: 6+
Driver: 1
Passengers: 1
Special: anyone targeting a moving bike suffers -2 to hit it.
Bike with sidecar - 60 Thrones
WS: N/A
BS: N/A
S: 2
T: 3
W: 2
I: N/A
A: N/A
LD: N/A
Sv: 6+
Driver: 1
Passengers: 2
Groundcar - 80 Thrones
WS: N/A
BS: N/A
S: 5
T: 3
W: 5
I: N/A
A: N/A
LD: N/A
Sv: 5+
Driver: 1
Passengers: 3
Truck - 100 thrones
WS: N/A
BS: N/A
S: 6
T: 3
W: 6
I: N/A
A: N/A
LD: N/A
Sv: 5+
Driver: 1
Passengers: 8
Open-topped truck - 100 thrones
WS: N/A
BS: N/A
S: 5
T: 3
W: 6
I: N/A
A: N/A
LD: N/A
Sv: 5+
Driver: 1
Passengers: 4
Gunners: 1
Special: can have a weapon mounted on the back, equal to the cost of the weapon +10 Thrones. The weapon can also be twin-linked, such as a twin-linked autogun or heavy stubber. This costs the same as two of the weapon +10 thrones. A twin-linked weapon scores two hits for every successful hit roll.
Territories and Income / Wasteland exploration
You will need money to survive. This is mostly derived from territories you control. Each day a ganger can go to one of your territories to collect income. You can only collect from each territory once per week. At the start of this game you will have 1 territory - a drinking hole - as the rest have been claimed by rival gangs. This also doubles as a makeshift base of operations for the time being.
Defending these territories and expanding to control new ones will be important to keep yourselves well-funded, allowing you to buy better weapons or hire new subordinate gang members. You do not need to buy typical ammo or food etc, as these costs are assumed to be represented by the random amount generated for income.
All income generated goes into a shared gang 'bank' meaning everyone shares the same amount of money. This is stored at your base, which is always one of your territories. If your base is raided or destroyed, you may lose some or all of your money. Usually the gang leader is responsible for ensuring the money is not squandered, with gangers asking permission for purchases. This is a two-way street however - if a gang leader withholds money too much or keeps it for themselves, they will often find themselves being challenged for leadership of the gang as a result. This is rare as usually the leader is respected by the others, but there are those who rule with an iron fist and push their luck. In this game, since your gang starts with no leader, this will depend on whether you elect one of your own as the new leader or if you join another gang and then are subject to the decisions of an NPC leader (unless you later usurp that leader's position and take over the gang).
To gain new territories, you can either try to take them from other gangs or search for new ones. Unlike the last necromunda game, with an emphasis on base-building, economy and micro-managing a lot of characters, this game is going to be more narrative driven - therefore the acquisition of territory and income will be determined by good planning and decision making by the players. You may want to hold onto a few precious territories rather than attempt to defend a vast number, as it is impractical and reckless. The more territories you have, the harder they are to protect against attacks, especially as you can't keep your eyes on all of them at the same time. Each character can check a territory once per day passively to ensure it hasn't been stolen or attacked. If they are collecting income, then this is the same territory they check.
If you want your character to go searching for a new, unclaimed territory, a D100 is rolled. This can only be done once per day and carries a risk.
01-20 - Chem pit
21-30 - Old Ruins
31-40 - Slag
41-45 - Mineral Outcrop
46-50 - Settlement
51-55 - Mine Workings
56-60 - Tunnels
61-70 - Vents
71-75 - Homestead
76-80 - Water Still
81-85 - Drinking Hole
86-87 - Guilder Contact
88-90 - Friendly Doc
91-94 - Workshop
95-96 - Gambling Den
97-98 - Archeotech
99-100 - Green Hivers (choose any)
Regardless of the result, a second die is rolled to decide if there were any complications in the search:
01-15 - Safe! No issues
16-30 - Followed. You must either hunt down and kill the people following you or else you can only gather income from the new territory once.
31-45 - Gunfight. This town ain't big enough for the both of us. Fight 1 random hostile enemy.
46-70 - Roll on the Wasteland random encounter table.
71-75 - Wrong turn. You accidentally end up in hostile gang territory. Escape will be difficult. You can only claim the territory if you defeat the enemy gang. If you escape you can return to this territory in the future, as your character knows the location.
76-80 - Blessed by the Emperor. You roll twice for territory and can choose the one you prefer.
81-90 - Oh no. Scrapworms. Pray for your life.
91-100 - Disaster! Roll 3 times on this table, re-rolling any other Disaster! results until you get something else.
If you simply choose to go into the wastes then you have a 50% chance of rolling on the table in addition to whatever else you face.
Having a ratskin scout with you lets you re-roll the result once.
Wastes random event table 1d100
01: Archeotech
02-33: Monsters - roll a D10: 1-3) D6 Giant Rats 4-5) D6 Ripper Jacks 6-7) D6 Milliasaurs 8-9) D3 Scrap Worms 10) Scrap Worm Matriarch
34-36: Loot Cache - random rare item
37-51: Calamity - Suffer one serious injury roll
52-59: Mutants - roll a D6, 1-5 D3 regular mutants, on a roll of a 6 a legendary mutant appears
60-62: Loot cache - random rare item
63-68: Plague Zombies - D3 plague zombies per person appear
69-70: Enlightenment - a free roll on any skill table
71-72: Forgotten place - gain one random new territory
73: Radioactive chemicals - suffer a mutation.
74-77: The wyrd and wonderful - an unbound psyker crosses your path and attacks, unable to risk you reporting them
78-80: Minor valuables - precious gems or nutritious sludge can be sold for a small profit. Gain 3d10 thrones
81-85: Frozen Grave - must pass D3 toughness tests or suffer a strength 6 injury per failed test.
86-87: Stranger Danger - There's something out there...
88-89: Toxic Pit - must pass an initiative test or suffer a roll on the serious injury chart.
90: Jackpot - Find precious minerals or a lock box full of rare collectables, that are sold for D100x2 thrones.
95-96: Face Your Fear - Must pass a leadership test or their leadership is permanently halved, rounding up, as they are mentally scarred.
97-100: A night to remember - roll again on this table D3+1 times
Training Day encounter D6
1 - Wolf Spider (Rating: 40)
2 - Giant Rats (Rating: 35)
3 - Carrion Bats (Rating: 20)
4 - Milliasaurs (Rating: 40)
5 - Ripper Jacks (Rating: 40)
6 - Plague Zombies (Rating: 50)
Roll:
D3 per person
XP is +5 for every hostile beast killed[/spoiler]
Territories
Chem Pit (1D10 thrones)
An extensive and highly dangerous chemical pit lies nearby. The pit is a source of constantly changing chemicals, sulphurous deposits and all kinds of poisonous and corrosive substances. If you want to collect chemicals from the pit and sell them to local addicts or "scientists" then you will get a small pay.
Old Ruins (2D10+10 thrones)
There is an exposed area of ancient ruins not far from your settlement. If a ganger searches through the ruins he may find scrap pieces of archeotech, bits of old metal or interesting old curios.
Slag (2D10+5 thrones)
Near your esttlement there is an extensive network of tunnels and crawlholes full of iron slag and other solidified chemical wastes. A ganger can break it up ready to sell to local Guilders.
Mineral Outcrop (4D10 thrones)
Not far from your settlement there is an outcrop of mineral wastes where a ganger can collect valuable sparstones, adonite crystals and igneous adamantorite, or one of the many other kinds of mineral gems that are formed in the underhive.
Settlement (20+3D10 thrones)
The families of your gang fighters own holes or workshops inside the settlement where the gang is based. These holdings help to support the gang by providing food, shelter and a vital link with the local traders. In addition, there is a chance of a young relative leaving the settlement to join your gang, which will gain you 1 Juve.
Mine Workings (2D10 thrones)
In a secret location in the wastes your gang has discovered a mine. The excavations yield carnotite gems or some other valuable ores or stones. Friends of the gangers are already working in return for a slice of the proceeds. You collect your share of the profits as your gangers don't have the time to work there. You can also send slaves into the mines to increase your profit by +10 per slave. This is typically an option reserved for captured gang members, but if you want to be a body snatcher for the sake of money, then who's going to stop you... well, you'll probably find out.
Tunnels (1D10 thrones)
Your gang has found a buried entrance to a labyrinth of ancient service ducts beneath the dome floor, full of scrap. Also, with enough exploration, you might find that your tunnels might lead somewhere unexpected...
Vents (1D10 thrones)
The gang has found a concealed entrance into a network of ancient ventilation shafts, full of techno-gubbinz.
Homestead (3D10 thrones)
One of the gang members comes from a homestead out in the wastes. The homestead produces a crop of nutritious slime which the ganger can help his family carry to the local trade post in return for a cut of the profit.
Water Still (2D10 thrones)
The gang has discovered and renovated an old water still out in the wastes. The still is worked by the family or friends of one of the gangers. Guilder slave trains carry the water to local settlers making the gang a share of the proceeds.
Drinking Hole (3D10+30 thrones)
Your gang leader has inherited an old drinking hole in payment of an outstanding gambling debt. The hole earns a small sum and also provides the gang with a convenient base in the local settlement. It is a profitable business and a prize territory.
Guilder Contact (Special)
A local Guilder has offered you favourable rates in return for your business doing various jobs.
You can also sell rare artefacts to the Guilder contact instead of on the Black Market for a substantially better price.
Friendly Doc (D10 or 15 thrones)
One of the local medical practitioners has offered to pay you in return for blood and tissue donations from your gangers. The Doc will also give you +15 thrones for dead bodies (typically your gangers, or prisoners), providing him with a useful supply of organs and limbs.. or worse, a victim to experiment on (if alive).
Workshop (3D10 thrones)
The family or friends of one of your gang fighters runs a workshop in the local settlement. You can trade in bits of scrap or other odds and ends in return for cheap repair work or cash.
Gambling Den (3D10 thrones/special)
Your gang runs a gambling den in an old disused hole in your settlement. Although the income from running a game is good, it is a risky business because underhivers are notorious cheats and bad losers too. If you decide to run a gambling session, then it is possible to win or lose substantial amounts, even if you try to rig the game in your favour.
How much is at stake obviously depends on who is at the game. A scummer isn't going to have much, but a Guilder or other Gang Leaders will likely have much more to stake. Such arrangements are risky, but potentially very profitable if they go without a hitch... assuming everyone keeps their hands on the table and weapons holstered.
EDIT: it now has a flat but random income. To represent the chance of a losing streak on your gang's part, if you roll any number twice (or more) then that amount is deducted. E.g. if you rolled three 5s and one 7, then your income for this territory would be +2 and -15 for a total of -8.
Spore Cave (2D10 thrones)
Your gang has discovered a hidden cave where many kinds of rare fungi grow, such as pearl spore and iron mould. A ganger can harvest the fungi and sell it to local traders.
Archeotech (D20+20 thrones/special)
Your gang has discovered a hidden entrance into a small unexplored dome full of treasures from eras long since forgotten. Your gangers can collect remnants of ancient technical devices for a good amount of money.
However, you can exploit this hidden treasure trove for more money each week if you desire, adding any number of +D20 thrones up to a maximum of 10D20 thrones in one go. However, the risk of people at the trading post getting suspicious and discovering that you have found a new source of Archeotech greatly increases. If you roll any doubles then you have been spotted by someone and the word will be spread. If the secret gets out then your gangers will venture into the dome one day to find it full of scavengers, prospectors and other treasure hunters seeking their fortune, picking it bare.
If this happens, then the territory becomes Old Ruins instead.
Green Hivers (choose)
You befriended a group of settlers who have migrated from the upper Hive City to the Underhive to start a new life. Possibly your gang chanced upon the settlers lost or dying in the wastes. Maybe they are relatives or friends of one of your gangers who have deliberately sought them out. Thanks to your contacts and influence you are able to give the green hivers a good start, and naturally they are grateful for your assistance and only too pleased to help in the future. You may choose any type of territory from the chart. The territory represents the vocation of the settlers or a discovery they have chanced across in their journey to the Underhive. The territory yields the appropriate income for its type.
NPCs, enemies and allies
Bloody Fang
Stavos Grimm
WS: 4
BS: 4
S: 4
T: 4
W: 4
I: 4
A: 2
LD: 9
Sv: 2+
Carapace armour, power sword, plasma pistol
Skills: Iron Jaw, Combat Master, Feint, Hard as Nails, Killer Reputation, Intimidating, Iron Will
Bloody Fang hero
WS: 4
BS: 4
S: 3
T: 3
W: 2
I: 4
A: 3
LD: 8
Sv: 4+
Flak armour, knife, boltgun or chainsword and bolt pistol
Skills:
Bloody Fang brute
WS: 4
BS: 4
S: 4
T: 4
W: 2
I: 4
A: 1
LD: 6
Sv: 4+
Flak armour, shock maul and laspistol or great weapon
Skills:
Bloody Fang heavy
WS: 3
BS: 4
S: 4
T: 3
W: 1
I: 3
A: 1
LD: 6
Sv: 6+
Metal armour, heavy stubber, knife, laspistol
Skills:
Bloody Fang Specialist
WS: 3
BS: 4
S: 3
T: 3
W: 1
I: 5
A: 1
LD: 6
Sv: 5+
Flak armour, flamer or long-las
Skills:
Bloody Fang ganger champion
WS: 4
BS: 3
S: 4
T: 4
W: 1
I: 3
A: 2
LD: 7
Sv: 5+
Flak armour, chainsword, laspistol
Skills:
Bloody Fang ganger
WS: 3
BS: 3
S: 3
T: 3
W: 1
I: 3
A: 1
LD: 6
Sv: 6+
Metal armour, lasgun or shotgun and sword or axe
Skills:
Bloody Fang juvie
WS: 2
BS: 2
S: 2
T: 3
W: 1
I: 3
A: 1
LD: 5
Sv: 6+
Metal armour, stub pistol and knife
Skills:
Shadow Gorgons
Shadow Gorgons leader
WS: 3
BS: 5
S: 3
T: 3
W: 3
I: 5
A: 2
LD: 9
Sv: 4+
Combi-needler, needle pistol, poison knife, flak armour, camo cloak
Skills: Dodge, infiltrate
Shadow Gorgons hero
WS: 3
BS: 4
S: 3
T: 3
W: 2
I: 5
A: 2
LD: 8
Sv: 4+
Flak armour, knife, Hellgun, stub revolver with silencer, sword, camo cloak
Skills:
Shadow Gorgons brute
WS: 3
BS: 3
S: 4
T: 3
W: 1
I: 4
A: 1
LD: 6
Sv: 4+
Flak armour, shock maul and laspistol or great weapon
Skills:
Shadow Gorgons heavy
WS: 2
BS: 4
S: 4
T: 3
W: 1
I: 3
A: 1
LD: 6
Sv: 6+
Metal armour, multilaser, knife, laspistol
Skills:
Shadow Gorgons Specialist
WS: 3
BS: 4
S: 3
T: 3
W: 1
I: 5
A: 1
LD: 6
Sv: 5+
Flak armour, flamer or long-las, camo cloak
Skills:
Shadow Gorgons ganger champion
WS: 4
BS: 3
S: 4
T: 4
W: 1
I: 3
A: 2
LD: 7
Sv: 5+
Flak armour, poison knife, laspistol
Skills:
Shadow Gorgons ganger
WS: 3
BS: 3
S: 3
T: 3
W: 1
I: 3
A: 1
LD: 6
Sv: 6+
Metal armour, stub gun with silencer, stub revolver
Skills:
Shadow Gorgons juvie
WS: 2
BS: 2
S: 2
T: 3
W: 1
I: 3
A: 1
LD: 5
Sv: 6+
Metal armour, stub pistol with silencer and knife
Skills:
Krom's Krusherz
Krom
WS: 3
BS: 3
S: 5 (10)
T: 4
W: 4
I: 4
A: 3
LD: 8
Sv: 4+
Flak armour, power fist, bolt pistol
Skills: Chemist, Ferocious Charge, Iron Will
Krusherz hero
WS: 4
BS: 4
S: 4
T: 4
W: 2
I: 4
A: 2
LD: 7
Sv: 4+
Metal armour, knife, power maul and sawed-off shotgun
Skills:
Krusherz brute
WS: 3
BS: 3
S: 5
T: 4
W: 1
I: 3
A: 1
LD: 6
Sv: 4+
Flak armour, shock maul and laspistol or great weapon
Skills:
Krusherz heavy
WS: 3
BS: 3
S: 4
T: 4
W: 1
I: 3
A: 1
LD: 6
Sv: 6+
Metal armour, heavy stubber, knife, laspistol
Skills:
Krusherz Specialist
WS: 3
BS: 3
S: 4
T: 3
W: 1
I: 5
A: 1
LD: 6
Sv: 5+
Flak armour, flamer or grenade launcher
Skills:
Krusherz ganger champion
WS: 4
BS: 3
S: 5
T: 4
W: 1
I: 3
A: 2
LD: 7
Sv: 5+
Flak armour, chainsword, autopistol
Skills:
Krusherz ganger
WS: 3
BS: 3
S: 4
T: 3
W: 1
I: 3
A: 1
LD: 6
Sv: 6+
Metal armour, Autogun or shotgun, flail
Skills:
Krusherz juvie
WS: 2
BS: 2
S: 3
T: 3
W: 1
I: 3
A: 1
LD: 5
Sv: 6+
Metal armour, auto pistol and knife
Skills:
The Skulltakers
Skulltakers Leader
WS: 5
BS: 2
S: 4 (6 with weapons)
T: 4
W: 4
I: 4
A: 3 (4 with weapons, 5 when charging)
LD: 9
Sv: 3+ (6+ FnP) (5+ dodge in melee)
Flak armour, 2 Chain Axes (+1 attack)
Skills: Mark of Khorne (all Ferocity skills, +1 strength), Combat Master, Step Aside
Skulltakers ganger champion
WS: 4
BS: 2
S: 4
T: 3
W: 2
I: 3
A: 2 (3 when charging)
LD: 7
Sv: 5+ (6+ FnP)
Metal armour, massive sword or axe
Skills: Mark of Khorne (all ferocity skills, +1 strength)
Skulltakers ganger
WS: 3
BS: 2
S: 4 (5 with weapons)
T: 3
W: 1
I: 3
A: 1 (2 with weapons, 3 when charging)
LD: 6
Sv: 5+ (6+ FnP)
Metal armour, 2 axes (+1 attack)
Skills: Mark of Khorne (all ferocity skills, +1 strength)
Ork Gang
Boss Gitstompa
WS: 6 (-1 power klaw)
BS: 2
S: 7 (14)
T: 6
W: 5
I: 4
A: 4
LD: 8
Sv: 6+
Metal armour, power klaw, big shoota
Ork Nob
WS: 5
BS: 2
S: 6
T: 5
W: 4
I: 3
A: 2 or 3
LD: 7
Sv: 6+
Metal armour, 'uge choppa or chain axe and slugga (+1 attack)
Ork Boyz
WS: 4
BS: 2
S: 5
T: 4
W: 3
I: 3
A: 2
LD: 6
Sv: 6+
Metal armour, Shoota or Slugga and Choppa (+1 attack)
Weapons:
Slugga
Pistol
Strength 4
Ammo roll: 4+
Shoota
Strength 4
Ammo roll: 4+
Big Shoota
Strength 4
Ammo roll: 4+
Sustained fire: 2 dice (2-6 shots)
Choppa
Strength: user
Damage: 1
Melee
Chainsword
Chain Axe
'uge choppa
Strength: +2
Damage: 1
melee
Power Klaw
Strength: x2
Damage: D3
melee
Monsters, mutants and abhumans
Ogryn
WS: 3 (4 on charge)
BS: 2
S: 6 (8 with weapon or 9 on charge)
T: 6
W: 4
I: 2
A: 1
LD: 6
Sv: 5+
Skills: Body Slam, Crushing Blow, Headbutt, Hurl Opponent, Strongman, Hard as Nails
Weapons: Massive axe or club, autopistol
Metal armour
Ambot
WS: 4
BS: 2
S: 6
T: 6
W: 7
I: 4
A: 3
LD: 10
Sv: 3+
Skills:
Weapons:
Enormous Claws
Close combat
Strength: user
AP: -3
Damage: 2
Can tunnel
Mutants and Monsters
Scrap Worm Matriarch
WS: 4
BS: -
S: 8
T: 6
W: 5
I: 3
A: 2
LD: N/A
Sv: 4+
Scrap Worm
WS: 4
BS: -
S: 7
T: 5
W: 3
I: 4
A: 1
LD: N/A
Sv: 5+
Scrap Worm larvae
WS: 3
BS: -
S: 5
T: 3
W: 1
I: 5
A: 1
LD: N/A
Sv: 6+
Mutant known as the Domestalker
WS: 4
BS: 4
S: 4
T: 4
W: 2
I: 6
A: 2
LD: 10
Sv: -
Skills: Ambush, Evade, Leap, Sprint, Catfall, Dodge
Can shoot corrosive acid/bile like a plasma pistol attack that never suffers ammo rolls.
Mutant known as Hivepounder
WS: 3
BS: 3
S: 6
T: 6
W: 3
I: 3
A: 3
LD: 10
Sv: -
Skills: Killer Reputation, Berserk Charge
Wolf Spider
WS: 3
BS: 0
S: 4
T: 3
W: 1
I: 1
A: 1
LD: 5
Sv: 6+
Webs: functions like a web pistol attack
Giant Rats
WS: 3
BS: 0
S: 2
T: 2
W: 1
I: 3
A: 1
LD: 3
Sv: 4+ DODGE
Carrion Bats
WS: 3
BS: 0
S: 4
T: 3
W: 1
I: 1
A: 1
LD: 5
Sv:
Flying - -1 to hit at range
Plague! - characters taken out of action by Carrion Bats have a 50% chance of contracting plague. Roll a D6. On a 1 they are unaffected. On a 2-5 they are very sickly and lose 1 Toughness but recover within a few days without other effects. On a 6 they will suffer brain death and will become a plague zombie - will they hide the bite or take the easy way out? The only chance to save themselves is to remove infected tissue - roll 3 times on the serious injury table re-rolling a Death or Captured result. Some would prefer to just die intact...
Milliasaurs
WS: 4
BS: 0
S: 1
T: 3
W: 1
I: 4
A: 1
LD: 4
Sv: -
Poison bite: if the Milliasaur wins the round of close combat, it bites them with poison fangs. Roll a D6. 1-2 No effect. 3-6 the victim is paralysed and chewed up by the Milliasaur. It immediately goes out of action and suffers serious injuries as normal.
Ripperjacks
WS: 2
BS: 0
S: 1
T: 2
W: 1
I: 4
A: 1
LD: 4
Sv: -
Envelop: Ripperjacks can be shot but not attacked in melee normally. If they make it into melee, then the victim must pass an Initiative test or be enveloped by the Ripperjack. If enveloped, the character may not fight or act until the Ripperjack is removed or he goes out of action. Each turn roll a 2D6 and if it equals or is below the character's strength they tear the Ripperjack off and free themselves. If an ally is helping, combine their strength values. If the roll is failed the character suffers a S4 hit with no save or dodge allowed. If they go out of aciton they suffer a serious injury as normal.
Flying: -1 to hit at range
Plague Zombies
WS: 2
BS: 0
S: 2
T: 3
W: 3
I: 1
A: 1
LD: 5
Sv:
Plague! - characters who is hit by a zombie or reduced to 0 wounds by Plague zombies chance of contracting plague. Roll a D6. On a 1 they are unaffected. On a 2-3 they are very sickly and lose 1 Toughness but recover within a few days without other effects. On a 4-6 they will suffer brain death and will become a plague zombie - will they hide the bite or take the easy way out? The only chance to save themselves is to remove infected tissue - roll 3 times on the serious injury table re-rolling a Death or Captured result. Some would prefer to just die intact...
Modifiers to plague roll:
Only suffered flesh wound -1
Not reduced to 0 wounds -2
Friendly Doc is part of gang's territory -1
Member of gang has Medic skill -1
Gang owns a medi-pack -1
Adeptus Arbites
Judge
WS: 5
BS: 5
S: 4
T: 4
W: 4
I: 5
A: 3
LD: 10
Sv: 3+
Skills: Nerves of Steel, True Grit, Killer Reputation, Specialist, Crack Shot, Iron Will
Armour: Carapace
Equipment: Helmet with in-built infra-goggles, photo-visor and respirator.
Weaponry: Combat Shotgun with executioner shells or Boltgun with Inferno bolts, Bolt pistol with red-dot laser sight or Plasma pistol or Power maul, frag and krak grenades or melta bomb or photon flash flare,
Arbitrator Sergeant
WS: 4
BS: 4
S: 3
T: 4
W: 3
I: 5
A: 2
LD: 10
Sv: 3+
Skills: Nerves of Steel, True Grit, Killer Reputation, Specialist, Crack Shot, Iron Will
Armour: Carapace
Equipment: Helmet with in-built infra-goggles, photo-visor and respirator.
Weaponry: Combat Shotgun with executioner shells or Boltgun with Inferno bolts, Bolt pistol with red-dot laser sight or Plasma pistol or Power maul, frag and krak grenades or melta bomb or photon flash flare,
Arbitrator Enforcer
WS: 4
BS: 4
S: 3
T: 4
W: 2
I: 4
A: 2
LD: 9
Sv: 3+
Skills: Nerves of Steel, True Grit, Killer Reputation, Specialist, Crack Shot
Armour: Carapace
Equipment: Helmet with in-built infra-goggles, photo-visor and respirator.
Weaponry: Combat Shotgun with executioner shells or Boltgun and Bolt pistol or shock maul and suppression shield, frag and krak grenades or melta bomb or photon flash flare,
Suppression shield: +1 save from frontal attacks, or 2+/6++ in melee. -1 Initiative cumulative with the carapace armour. It counts as a melee weapon using the wielder's strength.
Arbitrator Heavy
WS: 3
BS: 4
S: 4
T: 4
W: 2
I: 4
A: 2
LD: 9
Sv: 3+
Skills: Nerves of Steel, True Grit, Killer Reputation, Specialist, Crack Shot
Armour: Carapace
Equipment: Helmet with in-built infra-goggles, photo-visor and respirator.
Weaponry: Heavy Stubber or Heavy Bolter or Lascannon, bolt pistol, frag and krak grenades
THE GUILD
The seat of power in this sector of the underhive and far beyond. Even the Falcons know to respect the Guilders. To do business with the Guilders is a bold move indeed, for those who waste their time may land themselves in trouble for the slightest insult. The Guilders are the closest thing in the underhive to the nobles in the spires above. However, for gang leaders who fancy themselves an entrepreneur, the Emporium offers unlimited potential.
Lady Diona Thebe
WS: 2
BS: 3
S: 2
T: 3
W: 2
I: 3
A: 1
LD: 10
Skills: Barter, Haggle, Informant
Equipment: Refractor Field, Needle pistol
Lady Thebe is the current Chief Guilder of the Guild Emporium. That makes her the single most powerful person in the entire underhive. She strives to emulate the lofty presence that the nobles miles above possess, seeking to vaunt herself over the common scum, despite the fact that anywhere else in Hive Ulysses she is still just underhive scum - a fact that no doubt infuriates her to no end. But down here, she may as well be the Emperor Himself, for there is nowhere her influence cannot reach and nothing she cannot buy.
Captain Victor Roth
WS: 4
BS: 4
S: 4
T: 4
W: 3
I: 3
A: 3
LD: 9
Sv: 4+
Once a captain in the PDF, he got sick of wasting away. He wasn't doing any good or defending anyone and serving twenty years in the PDF before receiving his pay was not how he wanted to spend his life. So he went AWOL with almost an entire platoon of his men behind him, heading into the underhive. They were packing military-grade hardware and the skills to use them, offering their services to the highest bidder. He could have easily formed his own gang and carved out his own slice of the underhive, but it isn't his style.
He never wanted to be a criminal, and here he servers a purpose. He and his men form the bulk of the Guild Enforcers and they are the closest thing to a law enforcement body in this sector. Mostly his duties involve overseeing the peace in Gelttown, but he is not at all afraid to get his hands dirty and he has a reputation for personally dealing with the enemies of the Guild.
Tall and broad-shouldered, his reputation also has him as something of a ladies man, and he frequents the Golden Gelt on his nights off. However, the rumours that he is involved with Lady Thebe have never been addressed and none are foolish enough to pry into the captain's private life. It is said that he and Jaeger Ravion have met on several occasions, a few of which involved exchanging shots at each other, yet despite the odds they supposedly have a good deal of respect for one another.
That doesn't change the fact that they appear to loathe each other, yet even more unusual is the fact that on the rare occasions that Ravion personally does business with the Guild the two kick back in the Golden Gelt and laugh over old stories. How the most feared Gang Lord in the sector can even sit in the same room as the man who cut out his eye is a mystery no one has ever quite figured out.
As the Guild's top henchman, he is one person most people would prefer not to be dealing with.
Equipment: Flak Armour, one in a million Bolt pistol with Inferno shells, chainsword, frag and krak grenades
Skills: True Grit, Nerves of Steel, Iron Will, Inspiring, Crushing Blow, Hurl Opponent
Guild Enforcers:
Soldier
WS: 4
BS: 4
S: 3
T: 3
W: 1
I: 3
A: 1
LD: 8
Sv: 4+
Skills: Nerves of Steel
Equipment: Flak Armour, Lasgun or shotgun, shock maul, las pistol, frag grenade
Medic
WS: 4
BS: 4
S: 3
T: 3
W: 1
I: 3
A: 1
LD: 8
Sv: 4+
Skills: Nerves of Steel, Medic
Equipment: Flak Armour, Medkit, Lasgun, las pistol, frag grenade
Special weapons trooper
WS: 4
BS: 4
S: 3
T: 3
W: 1
I: 3
A: 1
LD: 8
Sv: 4+
Skills: Nerves of Steel, Specialist
Equipment: Flak Armour, meltagun or plasma gun or flamer or grenade launcher, las pistol, frag grenade
Heavy weapons trooper
WS: 3
BS: 4
S: 4
T: 3
W: 1
I: 3
A: 1
LD: 8
Sv: 4+
Skills: Nerves of Steel,
Equipment: Flak Armour, Heavy bolter or heavy flamer or missile launcher or autocannon, las pistol, frag grenade
Sniper
WS: 4
BS: 4
S: 3
T: 3
W: 2
I: 3
A: 1
LD: 8
Sv: 4+
Skills: Nerves of Steel, Marksman
Equipment: Flak Armour, Long-Las, las pistol, frag grenade
Sergeant
WS: 4
BS: 4
S: 3
T: 3
W: 2
I: 3
A: 1
LD: 9
Sv: 4+
Skills: Nerves of Steel,
Equipment: Flak Armour, Chainsword, las pistol, frag grenade
Guild Bodyguard
WS: 4
BS: 4
S: 3
T: 3
W: 1
I: 3
A: 2
LD: 8
Sv: 3+
Skills: Nerves of Steel,
Equipment: Carapace armour, Boltgun or Hellgun, Hellpistol or Power sword
UNDERHIVE FIGHTING AND INJURIES
In a game that involves a lot of this, seems it'd be prudent to explain it. Especially seeing as people fear their gangs suffering mass casualties.. more than I had anticipated.
Below, these are loose classifications of fights that cover virtually all likelihoods in this game.
---------------------------------
Skirmishes
Most gang fights will be relatively brief encounters, often between only a few gang members. Gangers are not fearless warriors and they want to survive the battle as much as you want them to. If a gang suffers 25% casualties (that's not necessarily dead, just 25% out of action) then they have to take bottle test. This means they use the highest LD available in the gang (usually the gang leader unless they are out of action or not present) or else the gang retreats, leaving the other gang victorious.
If a ganger who went out of action does end up dead in the post-battle results, then the victorious gang will get to scavenge the equipment from the body, be they former friend or foe.
However, there are specific kinds of gang wars other than skirmishes.
---------------------------------
Raids
A raid is when a gang targets a piece of territory from another gang. They must first know where it is, which requires some information scrounging (or just hire Sloan to find out). Once the gang knows they can attempt to raid that territory. They can't capture it, as they have no base of operations in that area, but they can loot it. This means they will get the equivalent of one week's worth of income from that territory, and the gang which controls it cannot collect any income from it that week.
Alternatively the raiders can destroy the territory. This means nobody gets any income from it and it is removed from play permanently. It has been entirely ransacked/burned to the ground by the other gang.
However, if members of the gang who own the territory are on-site at the time or the gang is able to get there in time (ie if they were in the settlement already) then a skirmish is fought out and if they win, their territory has been defended.
---------------------------------
Assaults
The enemy base makes a tempting target, however it is difficult to take. This was mentioned in a previous section, but I'll reiterate the relevant information here as well.
To take over a new base the enemy gang must be run out however they will only start taking morale tests when 75% of their gang is out of action rather than the usual 25% as they are fighting to defend their base. If the base is destroyed then the defenders will be forced to retreat and the battle ends.
There's also the fact that this is the other gang's home turf. They can often hide, set up ambushes, maintain the high ground, and usually have a good deal of cover available. This makes 'holding down the fort' a bit easier, even when heavily outnumbered - especially with rapid-firing heavy weapons such as a big stubber which can often gun down multiple foes as they charge towards the base.
Of course, there's also the possibility that the attackers will reach the base undetected. This is much easier during the darkness of the night cycle. The defenders will always have at least one sentry on watch however, unless none of them are in the base.
Some assaults aren't intended to destroy or capture and the attackers may simply seek to loot their enemy's stash and then get the hell out of dodge. This is not an easy task either but it can be simpler. All the attackers must do is breach the enemy base, locate the stash and then fight their way out. If successful, they'll have captured any money or equipment the defenders possessed that weren't on their person.
---------------------------------
Rescue mission
When a gang captures a member of a rival, they will usually try to ransom them back to their friends. This is because there is an unspoken understanding amongst gangers, for if they were ever in a situation where they were captured, they would not want to be executed. Of course, many completely ignore this while others still don't live to regret it.
This happens exactly like a raid or assault, because the prisoner will always be held at either the gang's HQ or one of their territories.
---------------------------------
Hit and Run
Often a gang won't want to get into a protracted skirmish. Instead, they'll blaze through an enemy settlement shooting the place up to send a message, and hopefully kill off a few of their foes. This type of attack is particularly effective when a gang is mounted on vehicles, for obvious reasons.
---------------------------------
Shoot Out
This type of fight is rare, but not unheard of. If two gangs happen to encounter each other by pure chance or in an unexpected place, things can get tense. Gangers are often trigger happy, jumpy or gung-ho. If this happens, then there is no guarantee the situation will be resolved peacefully - all it takes is one person to go for their weapon... (this simply involves everyone taking leaderships and if they fail, well, reach for your blasters)
---------------------------------
Scavenger Hunt
When gangers are sent out to scavenge, they might end up encountering each other.
If 2 or more separate gangs are scavenging, then on a 6+ they will run into each other. The likelihood of this roll increases by +1 for every additional ganger each gang has scavenging on that particular day.
If there is no fight, then each ganger will roll a D6. On a 4+ they have found something to sell, and will make D10 thrones. If they roll a 9-10 to determine their additional income, they will roll again and add it to the total. If they roll a 10 a third time, they find a rare trade item. If they roll a 1 in their search however, something has gone wrong...
There's also a chance they might find some long-lost rare item.
If there is a fight, then it will be played out like a typical skirmish.
In the all-too-common turf wars and street skirmishes that we will no doubt see many of over the course of this game, it is very likely that gang members will be taken out of action.
This can mean many things and until a fight is resolved the actual outcome is uncertain.
They may recover just fine, or they might suffer debilitating injuries, or they may even die. Sometimes one side is completely knocked out of action which leaves all participants in a fight to the mercy of the victorious gang!
This is why in most fights one gang will retreat after too many of their gangers go out of action, either by the decision of the controlling player to disengage or because the gangs' morale buckles and they retreat anyway. If you think you CANNOT win a fight, it is better to retreat! A successful initiative test is required to disengage from the fight, rolled on a D6+1. You can attempt to disengage once per round.
After each battle every ganger who went out of action will have a roll made by me on a chart that will determine what happened to them.
Now, as you don't want this to happen very often, try and fight battles when you have the advantage and in any case always try and use cover! Armour is fairly rare in the underhive and even if you do have it it's best to hide behind a metal wall or convenient pile of rubble.
In a fight, sometimes the gangers will only suffer flesh wounds - these aren't serious and they won't get a roll on the chart of doom.
There is also another state that gangers can be in: 'down' - this just means they're on the ground and in a bad way but they're still in the fight. If they are still down at the end of a fight they have a 50% chance to suffer serious injury and 50% chance to recover with no serious harm done to them.
When in combat there are a few different decisions you can make which will give positive or negative modifiers to certain dice rolls. The obvious examples are how many weapons can increase your strength in melee or are easier to aim at certain ranges, such as how a shotgun at short range can make a BS2 juvie a regular marksman.
Modifiers to hit at range:
-1 appearing/disappearing/charging
-1 fast moving/sprinting
-1 small target
+1 large target (anyone with strength or toughness 5 or above counts as a large target, this also applies to vehicles, buildings etc)
Ammo rolls - any roll of a 6 (usually a hit) indicates your weapon may have jammed or need reloading. A separate roll is made corresponding to the ammo roll of the weapon. A success means the weapon continues to function normally, and a failure means the weapon has run out of ammo, jammed for the rest of the fight or potentially explodes (such as overcharged plasma weapons).
Overwatch - a character can fire overwatch when an enemy charges them. They can fire a single weapon, but will only hit on a roll of 6+. This is a reactionary quick-shot as an enemy attempts to close the distance. If they fire overwatch they are at -1WS in the following combat if the attacker survives, as they are shooting instead of preparing to fight back.
Note - a roll of 1 always misses and a roll of a 6, even if increased by modifiers, is always going to trigger an ammo roll.
Cover types:
Light cover - +1 to armour save against ranged attacks.
Heavy cover - +2 to armour saves against ranged attacks.
Hiding - if your character is hiding because they failed a morale test, they cannot shoot or charge, or move other than to move into the nearest cover until they regain their morale. They get an additional +1 to their armour save.
Note - if a character has no armour, light cover confers a 6+ armour save and heavy cover confers a 5+ armour save.
Examples of light cover:
Barrels, vehicles, small walls, rubble, craters, sandbags, fences
Examples of heavy cover:
Ruins, being inside a building, statues, machinery
Modifiers to melee combat:
+1 Opponent fumbles (every roll of 1 on their attack dice is a fumble)
+1 Critical hit (every roll of 6 on your attack dice is a critical hit)
+1 Charging (if you made a charge move, i.e. ran into attack from a distance rather than turning to strike an enemy next to you)
+1 High Ground (Hello there!)
-1 Encumbered (if you carry a heavy weapon or other large object, including carrying fallen comrades)
-1 Obstacle (if your enemy is obscured, such as being in cover behind a table, a counter or low wall)
+1 Attack roll if fighting with two weapons (close combat or pistols).
-1 Outnumbered by enemies
If your character loses all their wounds, a D6 is rolled:
1 Flesh wound - they can continue to fight at -1 WS and BS for the rest of the battle. They count as still having 1 wound. If they sustain multiple flesh wounds to the point where their WS and BS would be 0, they go out of action immediately.
2-4 Down - a Downed fighter is stunned or wounded, but may recover. If you go Down in melee, you are at the mercy of your opponent who will usually take you Out of Action automatically. At the end of the turn, a character who is Down rolls another D6. On a 1-3 they recover with a Flesh Wound next turn, on a 4-5 they flee the fight and live to fight another day with no serious injury, and on a 6 they go Out of Action.
5-6 Out of Action - the character immediately rolls on the serious injury table. If they do not die, they are no longer able to keep fighting and will be recovered by allies after the fight if they are not captured. High Impact weapons (strength 7+) take a character Out of Action on a 3-6 rather than just a 5-6.
These rules only apply to your characters and some very powerful NPCs. Ordinary enemies are automatically killed outright when they lose their last wound.
Also, for attacks that deal multiple damage, you roll once on the above table for every point of damage past the one that took your final wound. These weapons are not very common and usually considered overkill - but when they do turn up, such as a boltgun, you might want to think twice about picking a fight as they can quickly put you down.
NEW serious injury table, roll a D100:
1-10 - Killed outright. The character was killed by their injuries. If the opposing group was victorious then they claim the weapons and equipment of the dead ganger.
11-20 - Multiple Injuries. Miraculously the character has survived a score of wounds. Roll another D6+1 times on this table, re-rolling 'dead' 'multiple injuries' and 'full recovery' results.
21-30 - Chest Wound. A vicious injury to the torso has weakened the character as a whole. Their toughness is reduced by 1.
31-33 - Left leg smashed. The leg is still attached but is permanently damaged. The character can no longer run or charge or use the sprint skill. If both legs suffer this result then the character can only shamble along very slowly as if they were at crawling speed.
34-35 - Left leg destroyed. The leg was vaporized, blown off or amputated after the battle. The character can no longer move other than crawling or using a walking stick. If both legs suffer this result the character can only crawl.
36-38 - Right leg smashed. The leg is still attached but is permanently damaged. The character can no longer run or charge or use the sprint skill. If both legs suffer this result then the character can only shamble along very slowly as if they were at crawling speed.
39-40 - Right leg destroyed. The leg was blown off or amputated after the battle. The character can no longer move other than crawling or using a walking stick. If both legs suffer this result the character can only crawl.
41-43 - Left arm smashed. The arm is still attached but it is permanently damaged. The character suffers -1 strength. They return to normal strength if it is replaced with a bionic.
44-45 - Left arm destroyed. The was blown off or amputated after the battle. The character can no longer use that arm at all (obviously). -1 Strength (not cumulative with -1S from smashed results) and cannot use two-handed weapons.
46-48 - Right arm smashed. The arm is still attached but it is permanently damaged. The character suffers -1 strength. They return to normal strength if it is replaced with a bionic.
49-50 - Right arm destroyed. The was blown off or amputated after the battle. The character can no longer use that arm at all(obviously). -1 Strength (not cumulative with -1S from smashed results) and cannot use two-handed weapons.
51-56 - Head wound. A serious head injury leaves the character somewhat unhinged. At the start of each game roll a D6 to determine how they are affected. On a 1-3 they are dazed and confused and use the rules for Stupidity. On a 4-6 they are enraged and uncontrollable and use the rules for Frenzy.
57-58 - Blinded in left eye. Whether they have just lost sight or their eye has been ripped out, they can no longer see with it and they suffer -1BS. If they are blinded in both eyes their WS, BS and I are immediately reduced to 1 unless they get a replacement in which case they return to what they had previously except at -1. If they get both eyes replaced their BS is restored.
59-60 - Blinded in right eye. Whether they have just lost sight or their eye has been ripped out, they can no longer see with it and they suffer -1BS. If they are blinded in both eyes their WS, BS and I are immediately reduced to 1 unless they get a replacement in which case they return to what they had previously except at -1. If they get both eyes replaced their BS is restored.
61-65 - Partially deafened. The character survives but is half deaf. If they go deaf again their leadership is halved.
66-68 - Shell Shock. They may suffer traumatic flashbacks or the like during battle, and must take a leadership test every round in a fight or else attack the closest person, friend or foe.
69-70 - Left hand injury. -1WS or BS with any weapon using that hand.
71-72 - Right hand injury. -1WS or BS with any weapon using that hand. -2 if both hands injured.
73-75 - Old Battle Wound. The character recovers but occasionally their old wound plays up before a fight, affecting their health. A d6 roll of 6 means they start the battle with -1 wound, to a minimum of 1.
76-80 - Bitter Enmity. Although they make a full physical recovery, the character has been psychologically scarred by the experience. They develop serious anger issues when it comes to the enemy in question. Roll a d6 to see who they hate (and makes them use the rules for Hatred in battle):
1-2 The individual who inflicted the injury.
3-4 The leader of the gang who inflicted the injury.
5-6 The entire gang responsible for the injury.
80-85 - Captured. They end up captured by the enemy side if they won. If the victorious side won then re-roll this result.
86-87 - Horrible scars. The character recovers but is horribly disfigured. They now cause Fear.
88-89 - Impressive scars. They are left with impressive scars that are a testament to their bravery and skill in battle. They gain +1LD. Multiple impressive scars are not cumulative.
90-100 - Survives against the odds. Whether they were seriously wounded or left for dead, the character makes a full recovery and gains +D6 experience points.
Battle condition modifiers:
Toxic dump/chemical factory
- every turn each character must pass a toughness test on a D6 or suffer a wound.
Night fighting
- all shots are taken at -1 to hit.
Burning wreckage
- all shots are taken at -1 to hit. Attempting to move through the flames requires an initiative test or catch fire as if hit by a flamer.
Collapsing dome
- every turn, on a roll of a 6 on a D6, every character takes a S4 hit.
Base Defense
- Defenders all count as having heavy cover (-2 to hit) unless the enemy breaches the base.
Base attack
- unless the enemy launches an all out assault, initiative tests must be taken to spot enemies as they approach. These tests are at -1 if it is night.
Creature Shop & Treasure Exchange
You can by exotic animals, beasts and monsters here. You can also sell rare items which you found in the wastes here for full price rather than half price as would normally be the case with selling items at the Trader Outpost.
When you buy a creature, you can decide its exact nature, as it is unlikely any two kind will be exactly the same.
The beasts count towards gang rating and get their own profiles.
Special Rules:
Any beast rider may shoot from their mount, but if it moved then they suffer a -1 penalty.
They can attempt to run over gangers on foot, but this requires a LD test from the rider.
If a Beast is rammed by a vehicle, then the rider's initiative is used to determine whether they get out of the way in time.
Bikes attempting to run down a beast take a single hit at the toughness of the beast.
Large and Gigantic beasts can actually be boarded like a vehicle, though this is quite dangerous.
Juves may not be beast riders.
If a beast is riderless then a D6 is rolled each round. On a 1-3 it remains where it is, but avoids danger. On a 4-6 it runs home (the gang's base or if it does not have one it escapes into the wastes)
Beasts cannot hide, or climb ladders. Duh.
If a beast runs, then any hit rolls made to hit it suffer a -1 penalty due to the speed.
When a beast is hit, then a dice is rolled. On a 1-4 the beast is hit and on a 5-6 a rider is hit.
A tiny beast can never have a rider or carry anything but what they lack in size they often make up for in deadly abilities.
A small beast is too small to have a rider but can fight alongside their masters. It uses the LD value of its master (one ganger it is assigned to when bought) and if their master goes down they will loyally defend their body.
A medium beast is much larger however it is only suitable for a single rider.
Large beasts are considerably bigger. They can have two riders and can also have a fixed weapon attached via a large harness. Anyone trying to hit a large beast gets +1 to hit.
Gigantic beasts are rare and expensive. They are slow, tough and can carry several people at once. They can have up to two fixed weapons attached, and anyone trying to hit one gets +1 to hit.
All beasts have an upkeep requirement:
Tiny - 3 thrones
Small - 6 thrones
Medium - 9 thrones
Large - 12 thrones
Gigantic - 15 thrones
If it can't be paid then the beast must roll once on the beast serious injury table. Any full recovery or captured results are ignored. This represents the beast foraging for itself in the settlements or wastes, which is more dangerous.
Costs:
Tiny beast - 10 thrones
Small Beast - 25 thrones
Medium Beast - 50 thrones
Large Beast - 100 thrones
Giant Beast - 250 thrones
Stats:
Tiny Beast
Pros
Unique abilities
Not too expensive
Cons
Weak
WS: 4
BS: 4
S: 1
T: 2
W: 1
I: 6
A: 1
LD: 2
Sv: -
Puny: All attempts to hit tiny beasts suffer -1. They also typically stay close to one master, either by their feet or on their shoulder. If their master is killed, they will skitter off into the underhive.
Special abilities: To make up for their small size, these creatures usually have some form of special ability. You may purchase one of the following upgrades:
Swoop attack - using a set of wings, the creature can fly and make dive bomb attacks, allowing it to inflict a single S6 hit on an opponent before immediately fleeing combat. Of course, as it is coming right for them, the target gets +1 to their combat score roll as they try to knock it out of the sky. Cost: 20 thrones.
Acidic Bile - the creature can produce deadly bile to spit at its enemies. This is a short-ranged attack that has the following profile: S5 -4Sv. If the creature dies, its master must take an initiative test or be hit by the bile as the unstable creature explodes. Cost: 25 thrones
Venomous Bite - a set of deadly fangs protrude from the creature's maw, dripping poisonous venom. In melee, the creature automatically wounds its opponent if it hits and instead of the usual injury chart, the following is used:
1-2 - the victim resists the venom and continues to fight as if they had suffered a flesh wound (-1 WS and BS).
3-5 - the victim is overwhelmed and collapses in a fit of spasms, frothing at the mouth. They immediately go out of action.
6 - as above, except the victim is particularly susceptible to the off-world poison and must roll twice on the serious injury chart after the battle.
Cost: 30 thrones
Banshee screech - the beast can produce a horrifying screech at extremely high-pitches. When done, everyone within a short radius is automatically affected by this ability. When rolling to wound, it counts as strength 7, but rolls against the target's leadership rather than their toughness. If the attack succeeds, it causes rolls on the injury table as normal. Note, the master of the creature is unaffected by this ability but other friendlies nearby will still be hit. Cost: 20 thrones
Small Beast:
Pros
Cheap
Loyal
Fast
Cons
No rider
Weak
WS: 3
BS: -
S: 3
T: 3
W: 1
I: 5
A: 1
LD: 3
Sv: -
Medium Beast:
Pros
All-rounder
Reasonable price
Cons
Quite middle of the road compared to larger or smaller creatures
WS: 3
BS: -
S: 3
T: 4
W: 1
I: 2
A: 1
LD: 4
Sv: 5+
Armoured hide: MB's have a 5+ save. If the rider is not wearing armour then they get a 6+ save while riding the beast.
Leadership: The rider's LD value is used.
Upgrades: Not all are the same. To represent this a medium beast may have any of the following upgrades:
+1WS
+1S
+1A
+1Sv
You may only purchase one of each at maximum. The first upgrade costs +10 thrones. Every subsequent purchase costs +10, so in total it would cost 100 thrones for all 4.
Large Beast:
Pros
Tough
Can have a fixed weapon
Cons
Quite expensive
WS: 3
BS: -
S: 4
T: 5
W: 2
I: 2
A: 2
LD: 4
Sv: 5+
Armoured hide: LB's have a 5+ save. If the rider is not wearing armour then they get a 6+ save while riding the beast. If the rider is wearing armour then it is increased by 1. E.g. a rider has carapace armour, so his armour save would increase to 2+ while riding the large beast.
Leadership: The rider's LD value is used.
Upgrades: Not all are the same. To represent this a medium beast may have any of the following upgrades:
+1WS
+1S
+1A
+1Sv
You may only purchase one of each at maximum. The first upgrade costs +20 thrones. Every subsequent purchase costs +10, so in total it would cost 140 thrones for all 4.
Gigantic Beast:
Pros
Tough
High transport capacity
Up to 2 fixed weapons
Cons
Slow
Very Expensive
WS: 2
BS: -
S: 5
T: 6
W: 5
I: 2
A: 2
LD: 4
Sv: 4+
Armoured hide: GB's have a 4+ save. If the rider is not wearing armour then they get a 6+ save while riding the beast. If a rider is wearing armour while riding the beast then it is improved by 2, to a maximum of 2+. I.e. Metal armour would become a 4+ save.
Leadership: The rider's LD value is used.
Frightening: So huge and fearsome, these creatures cause Terror/fear checks in their enemies. The riders are also immune to fear and terror while riding.
Close-combat: Gigantic beasts are so huge that when in melee, only they will fight. Riders cannot engage in melee. However they can continue to shoot as they are not in melee.
Upgrades: Not all are the same. To represent this a medium beast may have any of the following upgrades:
+1WS
+1S
+1A
+1Sv
You may only purchase one of each at maximum. The first upgrade costs +30 thrones. Every subsequent purchase costs +10, so in total it would cost 180 thrones for all 4.


